In CodeCharge Studio dynamic data is displayed using fields that are contained within different types of forms. The data that could be displayed in a form field depends on the data source configured for the form. In other words, a forms data source determines the selection of database fields that a field in that form could be configured to display.
This section will examine how form data sources are configured. It will show how to configure a form data source from scratch as opposed to using a form builder to automate the process of building the form and its data source.
A form data source is configured using the Visual Query Builder dialog window. The Visual Query Builder dialog window can be accessed by the Data Source property of a form in the Data tab of the Properties window.
In addition to facilitating the configuration of a data source for a form the Visual Query Builder dialog window is used to setup input parameters. Input parameters are values that are received by the form and used in the process of filtering the data that is displayed in the form. Input parameters can be received from other forms, via the URL, cookies or session variables.
For instance, a search form working in conjunction with a grid form makes uses of input parameters. The search form submits the input parameters and the grid form receives them and uses them to filter the records that are retrieved and displayed on the grid. All record forms have at least one input parameter defined in their Data Source. This input parameter is used to receive the primary key value of the database record which the form should retrieve. In most cases, the input parameter is received from a URL that originates from a Link field within a grid form where the database records are listed.
| Property | Description |
|---|---|
| Table | |
 |
Select the type of data source to be used to obtain the data [Table, Procedure, SQL]. |
 |
The name of the connection where the data will be retrieved. This can be any one of the connections listed in the Project Explorer window. |
 |
Open the Connections window where you can add, modify, remove or test connections. |
 |
Update the window to reflect the current database status if changes are made while using the Data Source window. |
 |
Display the list of tables available in the connection if you need to add a table. |
 |
Display the Join Link orTable Properties windows. The Join Link window contains the properties of a join. Joins are the lines that appear between two tables to represent a relationship between the tables. Click on a join line then click on this button to display the Join Link window.
If you click on the properties button when a table is selected the Table Properties window appears and you can enter an alias name for the table. An alias is an alternate name that can be used, for example, when you want to assign a shorter or more meaningful name to a database table. |
 |
Delete the selected table or join. |
 |
Display the SQL statement corresponding to the table and join setup in the Visual Query Builder. This is the SQL statement will be executed during run-time to retrieve fields for the form. |
 |
Retrieve and display a sample of the database content based on the data source type selected . You can specify the number of records returned by entering a value in the Row Count field and hitting the Refresh button to retrieve the records. |
 |
Add a parameter to the where clause. Please refer to the section on Using the Table Parameter window for more information. |
 |
Remove a parameter from the where clause. |
|
View the configuration of an existing where clause parameter. |
 |
Move a parameter upwards in the order of appearance. |
 |
Move a parameter downwards in the order of appearance. |
 |
Enclose a parameter definition within brackets. Group together multiple parameters by holding down the ctrl key while clicking each one. Then click on the button to place a bracket around all the selected parameters. |
 |
Remove existing brackets around a parameter definition or multiple parameters. |
| Stored Procedure | |
| Procedure | Select the stored procedure to be used as the data source. |
| Get Parameters | Retrieve the stored procedure parameters from the database. |
|
Add a stored procedure parameter. Please refer to the section on Using the Stored Procedure Parameter window for more information. |
|
Remove an existing stored procedure parameter. |
|
View the configuration of an existing stored procedure parameter. |
|
Move a stored procedure parameter upwards in the order of appearance. |
|
Move a stored procedure parameter downwards in the order of appearance. |
| SQL Statement | |
| SQL Statement | The SQL statement to be used as the data source for the form. |
 |
Reset an SQL query to a previous state. |
|
Add an SQL parameter. Please refer to the section on Using the SQL Parameter Window for more information. |
|
Remove an existing SQL parameter. |
|
View the configuration of an existing SQL parameter. |
| Ok | Save the current configuration and exit. |
| Cancel | Close the window and discard any changes. |
When a form is created the Data Source property of the form is used to specify the database fields that will be available in the form. All the fields in a form often come from a single database table. In this case, the Data Source property will list only this single form.
It is also common to create forms whose fields come from multiple database tables. One way to construct such a form would be to manually specify an SQL statement which selects fields from all the necessary tables. However, an easier way to select fields from multiple database tables would be to use the Visual Query Builder (VQB).
The Visual Query Builder enables your to visually select fields from multiple database tables. You do not have to worry about constructing the SQL statement since the Visual Query Builder does this automatically.
There are many ways of getting to the Visual Query Builder. When building a form using any of the builders the Build Query button can be used to open the Visual Query Builder. You can also get to the Visual Query Builder by using the Data Source property of a form.
When the Visual Query Builder window appears another smaller window also appears that contains a list of the database tables available in the current connection.
Select the tables that you want to use in your grid. You can select multiple tables by holding down the ctrl key while clicking on the table name. Click Add to add the fields to the Visual Query Builder. Click Close to close the window.
The tables you select appear within the Visual Query Builder window; each in a small window containing a list of the fields in the table. Depending on how the fields in the different tables are named, you might notice that some tables are joined together by lines. These lines represent relationships between the tables. The relationship between tables is based either on the actual database definition, or implicitly based on the names of the fields in the table.
Some databases support what is called 'referential integrity' (e.g. SQL Server) which simply means that you can define links between tables based on the Primary Key defined in the tables. The Primary Key is one or more fields that uniquely identifies every record in the table. Other tables are linked to this table using a field called the Foreign Key. The Foreign Key is a value that is compared against the Primary Key values in another table to find specific records. e.g. use the project_id field in the Tasks table to find the project name in the Projects table. Referential integrity insures that the values in the tables are consistent. i.e. ensures that you cannot have a project_id value that does not have a corresponding project in the Projects table. Other databases (e.g. Access) do not support referential integrity, but do allow you to relate tables by arbritrarily linking fields to each other between tables. Other databases do not support any kind of table relationships.
Both the Data Dictionary and the Visual Query Builder will attempt to discover the relations between tables by querying the database definition. Besides the database though, the Visual Query Builder will include any relations that have been created in the Data Dictionary, plus any relations that may be inferred based on the names of the fields in the tables. Where there are no relations between tables, or the the relations cannot be discovered, the Visual Query Builder will attempt to infer any relations based on the field names. For example, the Tasks table has a field called 'priority_id', and the Priorities table also has a field called 'priority_id'. Since one of the fields (Priorities.'priority_id') is also a Primary Key, the Visual Query Builder infers these tables are linked and the relation is shown in the window. The Visual Query Builder window automatically creates these links if it encounters two tables with fields that are potential primary and foreign key fields, based on their name and data type.
Within the Visual Query Builder, there is no way to determine if a link is based on the database definition, inferred from the names of the fields, or part of the Data Dictionary description. However, when you open the database for the first time and view the relations between tables in the Data Dictionary, what you see is what is either defined in the database, or whatever the Data Dictionary was able to query about the database definition. It does not automatically infer any relations between tables based on the field names unless you specifically ask for them. If you want to create these implicit relations, you need to use the Suggest icon under the Data Dictionary tab on the ribbon bar. The Suggest action will create links between tables based on the field names and add them to the relationships that may, or may not, already exist. If you do not want these relationships, you use the Reset icon on the ribbon bar to remove these relations.
After adding tables to the Visual Query Builder you can change the links between different tables.
If any relationships are wrong or not needed, delete them by right clicking on them and selecting the Delete Link option.
You can create new join links by dragging a field from one table to another field in a different table. Once the join link appears between the tables you can use the properties button to confirm the joined fields and set the join type and the operator used for the join criteria [e.g. equals (=) , Less than (<), Is Null, etc].
Notice that the top field in all the tables has an asterisk instead of a field name. The asterisk is an SQL wildcard that represents all the fields in the table. If you want to make use of all the fields in the table make sure the checkbox adjacent to the asterisk is activated. Otherwise, select individual fields by activating their corresponding checkboxes. Use the Review Data button to confirm that you have selected all the required fields.
You can maximize the Visual Query Builder window and move around the individual tables to achieve better visualization of the relationships.
When dealing with Editable Grid and Record forms you have to indicate the primary key field for the table used in the form. The primary key field is used to uniquely identify a record within the table. Within a table, the text for the primary key field appears in bold typeface. The primary key for the countries table is country_id while the primary key for the genders table is gender_id. You can designate a field in the table as the primary key field by right-clicking on it and selecting the Primary Key option.
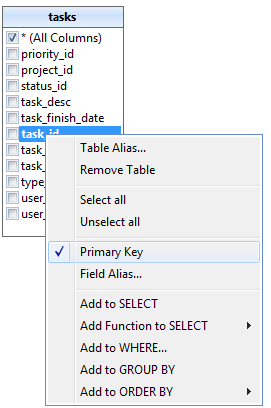
You can also use the pop-up menu which appears when you right-click on a field to specify a Field Alias. A Field Alias is essentially a substitute name to be used for the field. You can use an alias to define a more meaningful name for a database field without having to change the actual field name in the databases. Aliases are also used when two joined tables contain identically named fields. By assigning a unique alias to one of the fields no conflict will occur when the fields are referenced in an SQL query.
The Table Parameter window is used to define input parameters when a table is being used as the data source. Input parameters are used in the where clause of the SQL statement to determine the records to be retrieved from the table. For instance, the values submitted by a search form are received as input parameters by a corresponding grid or editable grid form and subsequently used to retrieve records based on the submitted search criteria.
The options available in the Table Parameter window vary depending on the selection made in the Condition Type field that appears at the top of the window. We shall first examine the available options when the Condition Type field is set to Parameter.
| Property | Description |
|---|---|
| Field | |
| Name | Name of the database table field that will be matched against the input parameter. |
| Type | Data type of the field: [Text, Integer, Float, Date, Boolean, Memo] |
| Format | Format of the field if applicable e.g. a Boolean field could have the format 0;1 or Y;N |
| And/Or | Specify whether the field should be included in the where clause using the 'AND' operator or the 'OR' operator. |
| Condition | Condition to be used to match the field value and the parameter value: [equals (=), does not equal (<>), less than (<), less than or equal (<=), greater than (>), greater than or equal (>=), begin with (like '...'), does not begin with (not like '...%'), end with ('%...'), does not end with (not like '%....'), contains (like '%;..%'), does not contain (not like '%...%'), is null (is null), not null (is not null)] |
| Parameter Source | |
| Name | Name of the input parameter or expression (block of code or a value in double quotes) |
| Type | Source of the parameter: [Expression, URL, Form, Session, Application, Cookie] |
| Format | Format of the parameter value if applicable e.g. a Boolean field could have the format True/False or Yes/No. |
| Use Default Value if parameter is empty | Default value to be used if no value is received for the parameter. You can opt to use the "Is Null" expression whenever the parameter is empty. |

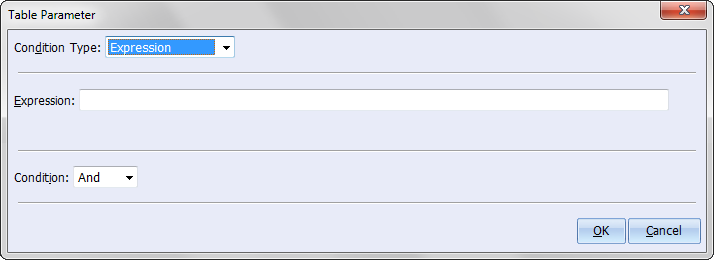
When theCondition Type field in the Table Parameter window is set to Expression the options in the window are different compared to when the Condition Type is set to Parameter.
With the Condition Type set to Expression you can then enter any valid SQL expression and select whether the SQL And or Or keyword should be used to add the expression to the rest of the where clause. An example of an expression would be [Year_Of_Birth > "1920"] where Year_Of_Birth is a field in the table.
The Stored Procedure Parameter window is used to define input parameters when a stored procedure is being used as the data source.
| Property | Description |
|---|---|
| Stored Procedure parameter | |
| Name | Name of the stored procedure parameter. |
| Data Type | Data type of the stored procedure parameter. |
| Data Size | Data size of the stored procedure parameter (if applicable). |
| Direction | Stored procedure parameters can be of different types. Select the type of the current parameter being referred to [Input, Input/Output, Output, Return Value]. |
| Scale | Number of decimal points for a number. |
| Precision | Number of digits for a number. |
| Parameter Source | |
| Name | The name of the input parameter. |
| Data Type | Type of input parameter [Expression, URL, Form, Session, Application, Cookie] |
| Format | Format of the input parameter value e.g. a Date could have the format mm/dd/yyyy (if applicable). |
| Default Value | Default value to be used incase no value is received for the input parameter. |
The SQL Parameter window is used to define input parameters when an SQL query is being used as the data source.
| Property | Description |
|---|---|
| Variable | |
| Name | Name of the SQL variable/field. |
| Type | Data type of the variable/field: [Text, Integer, Float, Date, Boolean, Memo] |
| Format | Format of the variable/field e.g. a Boolean parameter could have the format true;false (if applicable). |
| Parameter Source | |
| Name | Name of the input parameter source. |
| Type | Type of the input parameter: [Expression, URL, Form, Session, Application, Cookie] |
| Format | Format of the input parameter value e.g. a Boolean field could have the format True/False or Yes/No (if applicable). |
| Default Value | Default value to be used incase no value is received from the input parameter source. |
When setting up the Data Source property of forms the norm is to have a database table as the Data Source Type. However, situations arise where it would be more convenient to use a database stored procedure as the form data source. Configuring a form to use a stored procedure for the data source is not much different than configuring a table data source. The database you are using must support stored procedures and the particular stored procedure to be used must already exist in the database.
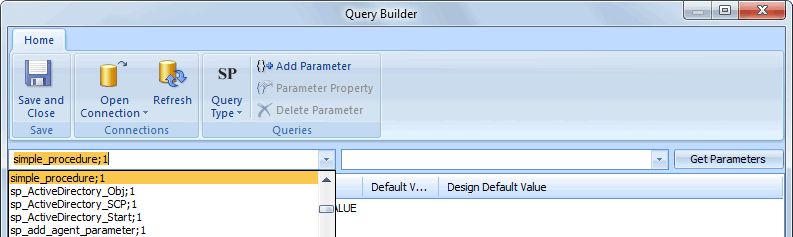
To configure a grid form to use a stored procedure click on the [...] button of the Data Source property for the grid. In the Data Source window set the Data Source Type field to Procedure. Once completed the Procedure dropdown list will contain the stored procedures available in the current connection. Select the procedure you want to use.
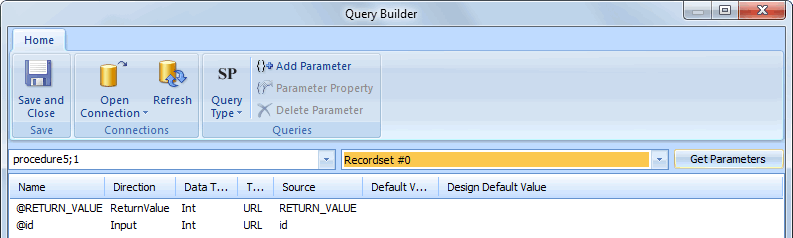
After selecting the procedure click on the Get Parameters button to retrieve any parameters defined for the procedure. In most cases, the parameters will be retrieved with their proper properties such as Direction and Data Type. You can double-click on any parameter and change its properties if the default ones are not correct. In the case of a grid form, the parameters are used to determine what records will be displayed in the grid so it is important that the Direction, Data Type, Type and Source properties be configured correctly. After configuring the properties, click Ok to close the Data Source window.
Once the Data Source is setup you can add fields to the form based on the fields returned by the procedure.
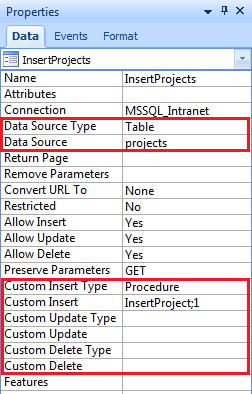
A stored procedure can also be used to insert, update or delete records using a record form or editable grid. You will notice that in the Properties window a record or editable grid form has the following properties:
If, for example, you want to use a stored procedure to insert records you would set the Custom Insert Type property to Procedure then use the Custom Insert property to configure the procedure in a similar manner as was done using the Data Source property. Similarly, the other four properties can be used to configure stored procedures to update and delete records respectively.
Note that a record or editable grid form can still have its Data Source property configured to use an ordinary table and yet have procedures for the insert, update and delete operations. This is because the Data Source property is different from the six properties mentioned above. Essentially, the Data Source property determines the means by which data will be retrieved to appear in the form while the other six properties mentioned above determine the means by which the data is manipulated depending on the operation (Insert, Update, Delete).
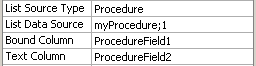
Stored procedures can also be used to populate ListBox and Radiolist controls. In this case, the List Source Type property is set to Procedure then the List Data Source property is used to configure the stored procedure and its parameters.
If you use a custom SQL statement as the data source for a grid or editable grid there are certain nuances you should be aware of. In order for the navigator control to be able to get a count of the number of records returned by the SQL statement, the underlying code has to dynamically create a query to return the record count. In most cases, the generated SQL query is able to execute correctly. However, if a complex SQL query is used, for example, one that has a Group By clause, the total number of records cannot be calculated correctly and the navigator control will not function properly.
In the event that you do use a complex SQL query you can manually edit the generated code where the CountSQL variable for the form is defined. You will need to provide an alternate SQL statement to be used to retrieve the proper record count.
Complex SQL queries also present problems for the sorter control which functions by appending an Order By clause to the original SQL query. If the query uses complex features such as Unions and nested queries, it will not be possible to dynamically create a correct SQL statement with the Order By clause. Try to use simple SQL queries or manually edit the generated code to implement a custom sorting mechanism.
Stored procedures can be used with record forms and editable grids, either automatically or by configuring custom insert, custom update and custom delete properties. However, stored procedures may not always work well with grids since the SQL needs to be altered at runtime to implement navigation and sorting, while stored procedure cannot be automatically altered or generated at runtime. For example the navigator control that is used to browse through grid records cannot create a procedure for extracting record count and therefore it cannot display the record or page count. You are restricted to using a simple navigator that has links only for browsing pages forward and backward. Grid's sorter controls also cannot be used with stored procedures as they function by appending an Order By clause to SQL statements.
CodeCharge Studio supports both input and output parameters of stored procedures.