There are two types of connections you can configure to use with CodeCharge Studio: design-side and server-side. Design-side refers to connections that you use with the IDE (i.e. CodeCharge Studio) to develop your application. Server-side refers to connections that your application uses after your application is published. This section describes design-side connections. Refer to Configuring the Server-Side Database Connection for the other type of connection.
Some ODBC drivers and OLEDB providers are part of your Windows OS installation (e.g. Access). Before you can use ODBC, or OLEDB, you must make sure that you have the proper driver/provider installed, and you will need the documentation for those connectors (e.g. MyODBC for MySQL) so you know what information is needed to define a database connection. You will need to refer to the database vendor's website to download the appropriate connector and documentation.
Depending on the database, you may be able to use one or several database connection methods. The common methods include ODBC/DSN and DSN-less. Normally for an ODBC connection, you define a DSN (Data Source Name), which is simply a configuration you define and name using the ODBC Administrator. Afterwards, programs such as CodeCharge Studio can refer to the named DSN to make a connection to the database. The ODBC Administrator and ODBC driver handle locating and loading the configuration parameters from the DSN.
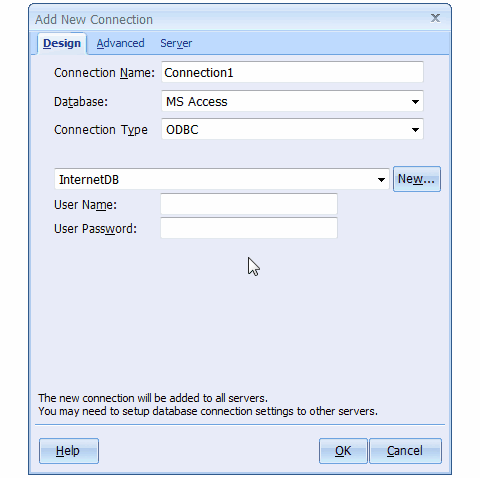
You can also connect to a database using a connection string. DSN-less refers to connections using connection strings. A connection string can only be used for OLEDB type connections. For ODBC connections, you must use a DSN. CodeCharge Studio provides a convenient way to build a connection string without having to know the particulars of the connector used, or the database type. The following are the common configuration options available for the design-side Connection.
| Parameter | Description |
|---|---|
| Connection Name | This unique user-selected name identifies the connection. No two connections within the same project can have identical names. You can use multiple connections with different names to, for example, use multiple databases in your project. |
| Use ODBC Data Source Name | This option should be selected if the connection to the database will be through ODBC. Using the list box field, you can select one of the ODBC DSN's that is currently registered on the machine. Alternatively, you can create a new ODBC DSN by clicking on the New... button. CodeCharge Studio automatically installs two ODBC DSNs for the sample databases installed with the IDE called 'CCSIntranet' and 'CCSInternet'. |
| Use Connection String | This option should be selected if you plan not to use ODBC. This option specifies a connection string that contains the details necessary to make a connection to the database. Some of the details normally included in the connection string are: database driver to be used, location of the database file, and the username and password needed to connect to the database. If you are an experienced user, you can simply type in the proper connection string into the provided field. However, CodeCharge Studio provides a convenient way to build a connection string using the Build button and the Data Link Properties windows to create the connection string. |
| User Name | Specify the username required to login to the database. This is required for connections that require a login to access the database. This is required if you have not defined a User Name in your DSN, or you do not include a use id parameter in your connection string. |
| User Password | Specify the password required to login to the database. This is required for connections that require a login to access the database. This is required if you have not defined a Password in your DSN, or you do not include a password parameter in your connection string. |
Open Database Connectivity (ODBC) is a driver interface that allows CodeCharge Studio and the generated programs to communicate with the database. A database connection requires specific parameters before the driver can connect to the database, such as the name of the database server and/or the name of the database instance. When you configure a Data Source, the connection information is normally stored in a common area, such as the registry, or a file, so client programs, such as CodeCharge Studio only need to refer to the Data Source by name. You do not need to know where this information is stored; this is handled by the driver and the ODBC Administrator.
This has a number of advantages since your CodeCharge Studio projects only need to include the name of the Data Source, rather than all of the configuration information. Therefore, several projects, or published applications, can have the same name, but different database connections. You can also change the database connection configuration without having to change your CodeCharge Studio project.
CodeCharge Studio provides a convenient way that you can create a new ODBC DSN. You can also create a DSN by running the ODBC Administrator available from your system Control Panel. In either case, the steps involved are essentially identical.
To create an ODBC DSN from CodeCharge Studio,
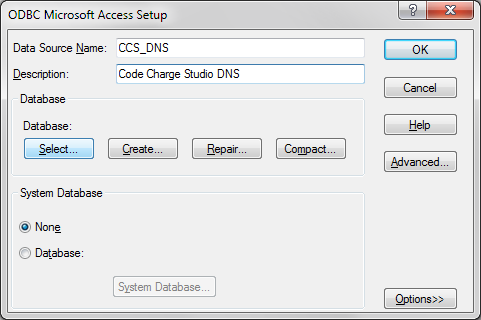
Creating an ODBC DSN for other databases such as MSSQL, Oracle, and Microsoft Excel involve similar steps. Each type of database normally requires specific configuration information particular to the database and the ODBC driver. Once you have created a DSN, you can use it in multiple projects by simply selecting it from among the list of available DSN's displayed by CodeCharge Studio.
Using the ODBC Connection in your CodeCharge Studio Project
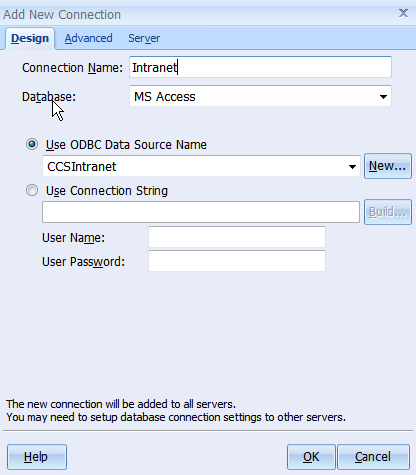
Unless your target platform is PHP or PERL, when you create a connection in CodeCharge Studio, you should see this version of the Add New Connection dialog. In the illustration, we create a connection to one of the sample databases installed with CodeCharge Studio called 'Intranet', using the 'CCSIntranet' DSN (which is installed with CodeCharge Studio).
| Parameter | Description |
|---|---|
| Connection Name | Name of your choice. |
| Database | This is the type of database you are connecting to. This lets CodeCharge Studio know the dialect of SQL to use and other options specific to the database. Even if you are using the Access ODBC driver, this should be set to Access. |
| Use ODBC Datasource Name | Select the ODBC DSN from the drop down list. |
| Username | User account to be used to access the database. This is required if your database needs a username and password login. This is required if your DSN has not been configured with a username. |
| Password | User password to be used to access the database. This is required if your database needs a username and password login. This is required if your DSN has not been configured with a password. |
When you are developing your application, there are many instances where you'll need to select a Table from your database. This tab allows you to narrow or expand the list of tables displayed by CodeCharge Studio. For example, Views, by default, are included in any Table lists. if you want to exclude Views, unselect the 'Show Views' option. The options you select here depend on the type of database you select. For example, some databases support Catalogs and Schemas, while others do not.
Refer to Configuring the Server-Side Database Connection for more details.
Earlier versions of CodeCharge Studio did not include a native MySQL interface in the IDE, so it was necessary to use an ODBC connection at design-time. This is no longer required. Now, by default, CodeCharge Studio uses a native interface when the target platform is PHP or PERL. Also by default, the design-side and the server-side connections are assumed to be the same, so you only define one connection.
You are not constrained to use native interface, or use a single connection. You can configure the design-side connection to use ODBC, OLEDB, or any other database type besides MySQL.
| Parameter | Description |
|---|---|
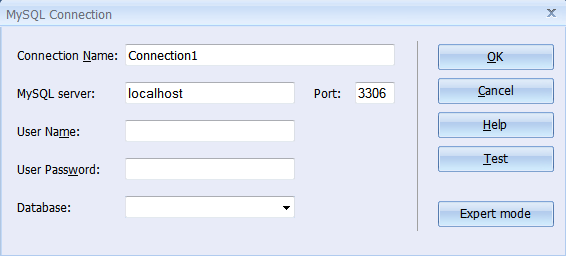
| Connection Name | Name of your choice. |
| MySQL server, port | IP address or the name of the server instance (e.g. localhost), and the port number (default is 3306) |
| User Name | User account to be used to access the database. |
| Password | Password corresponding to the User name. |
| Database | Database instance to connect to. |
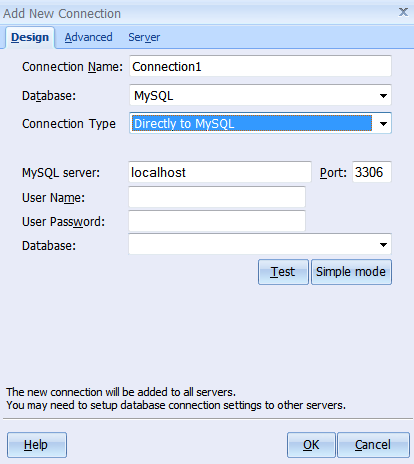
To configure a different type of connection, select 'Expert mode' on the default connection dialog. From this point, you have 3 options for configuring a connection to your MySQL database: ODBC, connection string, or Directly to MySQL (native interface). You can switch back to just the native interface by setting the 'Connection Type' to 'Directly to MySQL', and selecting 'Simple Mode' (not available on the other connection types).
There are 3 versions of the 'Add New Connection' dialog in Expert Mode depending the Connection Type you select.
| Parameter | Description |
|---|---|
| Connection Name | Name of your choice. |
| Database | This is the type of database you are connecting to. This lets CodeCharge Studio know the dialect of SQL to use, and other options specific to the database. Even if you are using the native interface to MySQL, this should be set to MySQL. |
| Connection Type | This indicates if you are using an ODBC DSN, a connection string, or the native MySQL interface. |
| MySQL server, port | IP address or the name of the server instance (e.g. localhost), and the port number (default is 3306) |
| Username | User account to access the database. |
| Password | Password corresponding to the User name. |
| Database | Database instance to connect to. If you have defined the proper connection info, including username and password, this should display a list of database instances on the server you specified. |
Besides the native interface, you can use any type of connection and database supported by the IDE (e.g. MyODBC driver). Also, in Expert mode, you can configure a different type of connection for your server-side connections. If you change the Connection Type to ODBC, or Connection String, completing the Add New Configuration is identical to configuring ODBC or DSN-Less connections as described here.
An alternative to using a DSN connection is a DSN-Less connection. DSN-Less refers to a connection you can define that uses a string of parameters containing all the details necessary to establish a connection to the database. The makeup of a connection string varies depending on the database being used as well as the OLEDB provider, or other connector. While it is possible to simply type out a proper connection string, CodeCharge Studio provides a convenient way to create a connection string for you, when you use OLEDB.
The Data Link Properties window can be accessed from the Add New Connection or Modify Connection windows by clicking on the Build button. The following list defines the important tabs of the dialog:
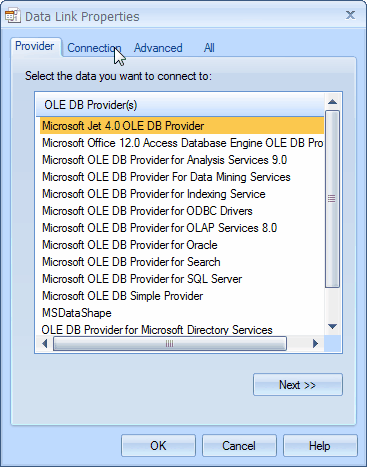
When you are finished defining a connection with the Data Link Properties window, CodeCharge Studio will generate a connection string and put the string into the field under 'Use Connection String' and pre-fill the username and password fields.
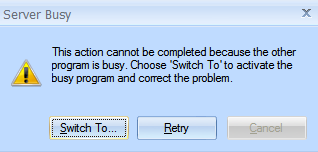
Note, you must complete or cancel the Data Link Properties window before you can continue in the IDE. If you switch windows back to the IDE, you may find that CodeCharge Studio is unresponsive to any input. To avoid this, simply find and select the Data Link Properties window and finish or cancel your selections.