 CodeCharge Studio
Calendar Builder creates a Web calendar that is based on a table or query containing date-specific information. To begin the process of creating a Web calendar, select it from the Toolbox panel.
Specify a database connection and builder options.
| Option | Description |
|---|---|
| Use an existing database connection | Select previously configured database connection. |
| Create... | Create a new database connection. |
| or select a sample database (Internet/Intranet) | Use one of the example databases provided with CodeCharge Studio as an alternative to selecting an existing database connection. If this option is selected the database connection will be created automatically. |
| No database used. Calendar does not contain any events. | The calendar will display only static information or an empty calendar template. |
| Internationalized | Create internationalized version of the calendar by using resource translation keys in place of text. |
| Save builder options | Preserve the options selected in steps 1 through 4 of the builder. The options will be automatically pre-selected the next time you use the Calendar Builder. |

Click Next to proceed to step 2.
| Option | Description |
|---|---|
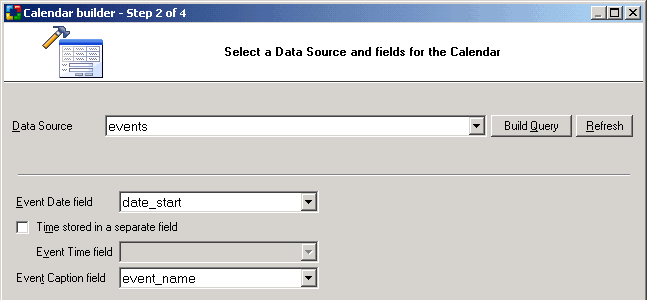
| Data Source | Table(s) for the calendar will be based on. Click Build Query to access the Visual Query Builder and design your database query or enter an SQL query statement. The table or query must contain at least one date or date-time type field. |
| Refresh | Refresh the list of tables and fields in the database. |
| Event Date field | The database field containing dates of events to be shown in the calendar. |
| Time stored in a separate field | The event time is stored in a separate field in the database. |
| Event Time field | The database field containing times of events to be shown in the calendar. |
| Event Caption field | The database field containing captions to be shown in the calendar. These can be event names, titles, descriptions, etc. |

Click Next to proceed to step 3.
| Option | Description |
|---|---|
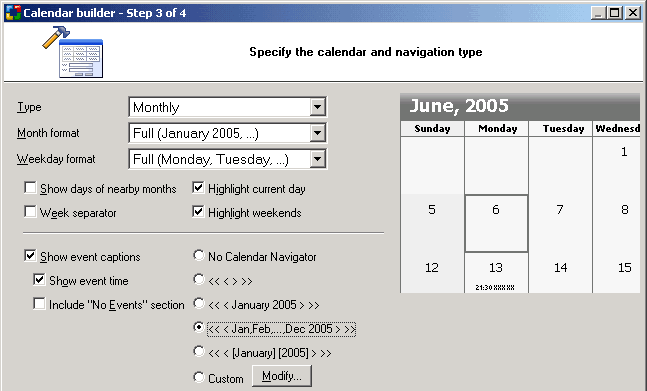
| Type | Type of calendar to build. It can be either an annual, quarterly, tri-monthly, or monthly calendar. |
| Month format | Format to be used to show month names in the calendar header. It can be a full month name, abbreviated (Jan, Feb, Mar), or numeric.
The format can also be changed later within the "MonthDate" property. |
| Weekday format | Format to be used to represent weekdays. It can be a full weekday name, abbreviated (Mon, Tue, Wed), or single letter (M, T, W). The format can also be changed later within the "Weekday Format" property. |
| Show days of nearby months | Display days from the surrounding months. Otherwise the calendar's cells with dates of different months will be empty. |
| Week separator | Creates customizable area between week rows, implemented as an HTML table cell that by default contains a horizontal line. |
| Highlight current day | Highlight the calendar cell containing the current date. The highlighting is implemented via separate styles (cascading style sheets), which may result in a different highlighted look depending on the selected style. Certain styles may show a highlighted cell background in a different color, others may place a thicker border around a highlighted cell. |
| Highlight weekends | Highlight calendar cells containing weekends. |
| Show event captions | Display event captions within calendar cells, which will result in calendar cells displaying the text from the "Event caption field" selected in Step 2 of the builder. You can convert the label displaying the event captions to a link that users can click to access another page showing selected event's details. |
| Include "No Events" section | Include a section that will be shown when there are no events for a given date. By default this section displays the text "No events". |
| Navigation | Type of navigation that you'd like to include for users to navigate through calendar periods. Several standard navigation types are available, plus "Custom" which can be configured with more specific options. |

Click Next to proceed to step 4.
Select one of the existing styles that you'd like to apply to your calendar, or click Style Builder to modify an existing style or create a new one. You can also select "(No Style)" if you don't want to use any style at all.