Form Templates are CodeCharge Studio pages you can use to create a customized appearance for the forms generated by the CodeCharge Studio Builders, such as the Grid builder and the Record builder. You can use form templates to add/change/delete HTML elements, such as separators, or just change the layout and styling of your forms.
The builders you can apply templates to are: Authentication (i.e. Login form), Editable Grid (i.e. Grid and Search forms), Grid and Record (i.e. Grid, Record and Search forms), Gallery (Gallery form), Grid (i.e. Grid and Search forms), Record, and Search.
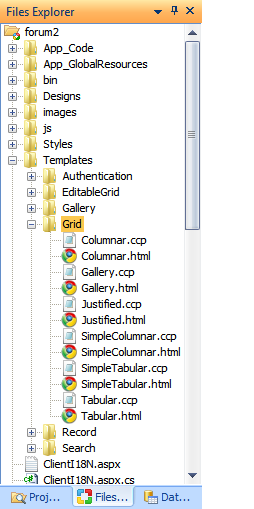
CodeCharge Studio comes with a number of built-in templates which are located in the 'Templates' folder of your installation path. The built-in templates include those corresponding to the layout choices previously available in the builders, plus additional templates with extra layouts and styling.
The form template uses specially marked blocks of HTML code, called template blocks, plus predefined tags used to represent dynamic content. The template blocks begin and end with an HTML comment (e.g. BEGIN Error, END Error). They mark special code that the builder expects to find in the template. For example, the template block called 'ControlContent in the 'Horizontal' template for a Record form is replaced by the builder with the controls and captions defined by the datasource you selected in the builder. The whole section represents one data row. When the form is generated by the builder on your web page, the tag {ControlTitle} is replaced with the field caption for the data row, and the {ControlTemplate} is replaced with the control corresponding to the the data item. The default caption and control type is defined in the Data Dictionary, and can be optionally overridden in the builder. The HTML for the caption and control in the form template coincides with the default stylesheets that CodeCharge Studio generates for your project in the 'styles' folder.
<table cellpadding="0" cellspacing="0" class="Record">
	<caption><br />
	</caption>
	<!-- BEGIN Error -->
	<tr class="Error">
		<td colspan="2">{Error}</td>
	</tr>
	<!-- END Error -->
	<!-- BEGIN ControlContent -->
	<tr class="Controls">
		<td class="th">{ControlTitle}</td>
		<td>{ControlTemplate}</td>
	</tr>
	<!-- END ControlContent -->
	<!-- BEGIN Footer -->
	<tr class="Bottom">
		<td align="right" colspan="2">{Buttons} </td>
	</tr>
	<!-- END Footer -->
</table>
Form templates are intended to be used to control the layout and styling applied to the form in the builder. Although they exist as CodeCharge Studio pages, you should not use them in this way. You should not add CodeCharge Studio components to a template. The reason is that when you add a component, CodeCharge Studio creates the HTML to render the component, plus the properties that affect the state of the component, and the source code that defines the behavior and appearance. All of this is stored and represented in different ways in your project. However, when you apply a form template, only the HTML is used by the builder. Specifically, the special template blocks and template variables are replaced with text and components by the builder. If you added a component, such as a TextBox to the form template, the resulting form would lack the code and properties for the component in the result and you would likely get errors when you published your pages since the code and HTML rendering would not be in sync. Modify only the HTML that describes the layout of the form.
The built-in templates are provided as a reference to start customizing the layout and styling of your form. When you customize one of these templates, you can use either CodeCharge Studio, or an external editor, but either way you change the template, you must take care when removing or changing the special template blocks.
If you delete a template block, make sure you delete everything, including the block markers, within the whole block; do not leave any unmatched beginning or ending block markers. If you remove one of these blocks, the builder will not generate that section of the form on your web page. Also, if you change any of the styling or 'class' definitions you must consider how the stylesheets apply to your changes.
The following example is from the 'tabular' template for a Grid. The 'ControlTitle' section represents the caption row generated at the top of the grid. Without this section, there is no 'caption' row. The 'Row' and 'ControlContent' sections are the rest of the rows of the grid. Both sections are required to generate the Grid.
<tr class="Caption">
<!-- BEGIN ControlTitle -->
<th scope="col">{Sorter}</th>
<!-- END ControlTitle -->
</tr>
<!-- BEGIN Separator --><!-- END Separator -->
<!-- BEGIN Row -->
<tr class="Row">
<!-- BEGIN ControlContent -->
<td>{ControlTemplate} </td>
<!-- END ControlContent -->
</tr>
<!-- END Row -->
Like the HTML template blocks, the builder also relies on some predfined tag definitions. Some of these are used by the builder when generating a form on your web page (e.g. {ControlTitle}), while others are content that is replaced at run time (e.g. {Error}).
| Tag | Description |
|---|---|
| {Title} | Form caption. This is either from the Data Dictionary, or from the builder. |
| {Error} | Used at run time to display error messages when processing the form (e.g. not entering a value for a required field). |
| {ControlTitle} | The field caption for the data item displayed on the form. This is based on the datasource you specify in the builder and the Data Dictionary properties. |
| {ControlTemplate} | Placeholder for the control type generated for the data item. This is based on the datasource you specify in the builder and the Data Dictionary properties. |
| {Buttons} | Placeholder for the buttons on the form based on the 'sorter' options you selected in the builder. |
| {Navigator} | Placeholder for the 'navigator' options on a grid form. This is based on the 'navigator' options you selected in the builder. |
| {Sorter} | Placeholder for the 'sorter' options on a grid form. This is based on the options you selected in the builder. |
| {NoRecords} |
Placeholder for the 'NoRecords' message that you specify in the builder. |
| {countControls} |
Placeholder for attribute 'colspan' from tag <td>. This is based on the datasource you specify in the builder. |
| {ClearLink} |
Placeholder for the 'Clear Link' options on a Search form. |
|
HTMLFormName, |
These are template variables important to the internal handing of an editable grid form. These should not be modified. |
| XXX_TotalRecords |
Placeholder for the 'display total number of records' option in the builders. |
One final note, make sure that the HTML in the template is valid since CodeCharge Studio needs to parse the HTML when you run the builder and any inconsistencies may not be handled correctly.
There are three ways you can add a form template to your project. You can copy and paste one of the built-in templates from the CodeCharge Studio 'installation' folder, or you can use the CodeCharge Studio project explorer to create a template by creating a new page and editing the HTML.
You can also add a template to your project simply by selecting one of the built-in form templates in the builder. If the template does not already exist, the template will be copied to your project.

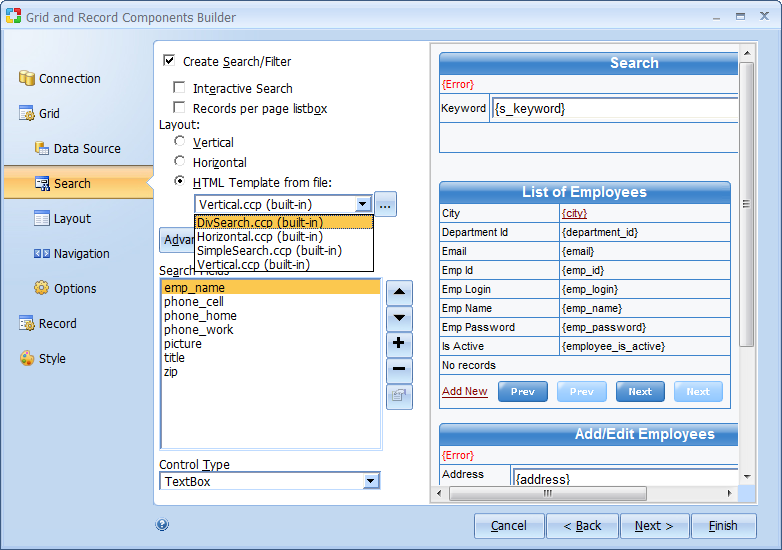
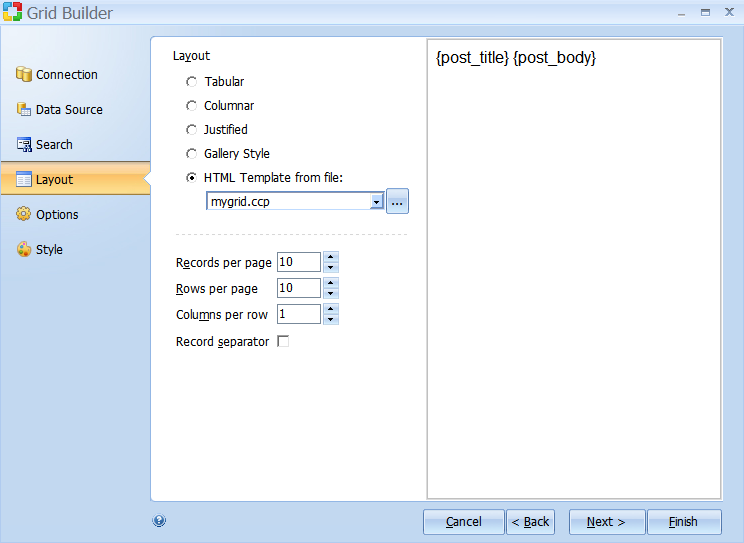
When you run the builder, you have the option of selecting a particular layout (which normaly corresponds to one of the built-in templates), selecting a built-in template from the installation folder, or selecting a template that has been added to your project. For form templates in your project, the builder will only display the files found in the 'templates' folder under the folder corresponding the builder (e.g. Record, Grid, etc.). If you keep your project templates in a different location, you will need to browse and select the specific template file (using the ellipsis ...).
If you create a form template, or copy and paste one of the built-in templates from the installation folder, you need to be aware of a few issues.
<!DOCTYPE HTML PUBLIC "-//W3C//DTD HTML 4.01 Transitional//EN" "http://www.w3.org/TR/html4/loose.dtd">
<html>
<head>
<meta name="GENERATOR" content="CodeCharge Studio 5.0.0.11675">
<meta http-equiv="content-type" content="text/html; charset=windows-1252">
<title>NewPage1</title>
<link rel="stylesheet" type="text/css" href="Styles/Basic/Style_doctype.css">
</head>
<body>
</body>
</html>
When you run one of the builders, one or more forms are created and added to your page. The number of forms generated depends on the builder and whether or not you have included a search form. For example, the Grid and Record builder generates a grid form, a record form, and a search form (if you have enabled this option). For each of these forms when you run the builder, you have the option of selecting a built-in form template, or supplying a template from your project.
How 'Styles' apply to your template depends how you wrote the template. A particular Style created by CodeCharge Studio consists mainly of two parts. One part is the CSS stylesheet that defines all the formatting rules. The other part is the generated HTML for your forms and components that are based on the stylesheet (CSS). In CodeCharge Studio, a 'page' type style means the CSS formatting rules apply to all the components (e.g. forms) on the page, while a 'component' style type only applies to a particular component. Which type of style that you select affects how the HTML is generated so that it coincides with the 'page' or 'component' type style. If you are using a custom form template, you need to make sure the template is consistent with the stylesheet you use. This also applies if you are using a Design. Whenever you have a Design applied to a page, you can always choose to use the CSS in your design instead of one of the Style profiles. If you choose this however, you need to make sure that the Design you select is consistent and complete for the HTML generated from your template.
This example shows how you can create the most basic type of form template to generate a form containing just the content of the database, then use another template to format the output at run time.
<!-- BEGIN Row -->
<!-- BEGIN ControlContent -->
{ControlTemplate}
<!-- END ControlContent -->
<!-- END Row -->
<div class="top-banner">
<div class="content">
<div class="entries">
<div class="entry">
<h2>{title}</h2>
<p>{text}<a href="./#top" class="back-to-top">Back to top ↑</a> </p>
</div>
</div>
</div>
</div>
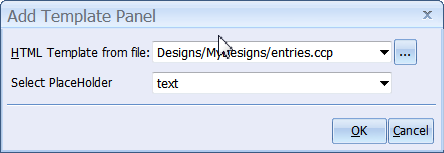
This code has two placeholders called '{title}' and '{text}' but at this point CodeCharge Studio does not recognize them as placeholders because they are defined only in the HTML. CodeCharge Studio will not create placeholders from these tags; you have to add the placeholders from the ribbon bar. In HTML mode, delete the template variable {title} and then add a placeholder in its place using the Forms | Placeholder icon on the ribbon bar. Do the the same for the {text} template variable.
.entries .entry:after
{
	content: ".";
	display: block;
	height: 0;
	clear: both;
	visibility: hidden;
	font-size: 0;
}
.entries .entry
{
	display: inline-block;
}
.entries .entry
{
	display: block;
	-height: 1px;
}
.content H1
{
	clear: both;
}

.entries .entry
{
	border: 1px solid #E5E9EF;
	/*+border-radius:5px;*/
	-moz-border-radius: 5px;
	-webkit-border-radius: 5px;
	-khtml-border-radius: 5px;
	border-radius: 5px 5px 5px 5px;
	padding: 15px;
	margin: 0 20px 20px;
	background-color: #F8F9FA;
}
.entries H2
{
	padding-bottom: 10px;
	font-size: 12pt;
}
.entries P, .entries UL, .entries OL
{
	padding: 0 0 10px;
	color: #6D798C;
	font-size: 10pt;
}
.entries DFN
{
	color: #000000;
}
.entries LI
{
	margin-left: 25px;
}
.entries .back-to-top
{
	display: block;
	float: right;
	font-size: 9.5pt;
	text-decoration: none;
}
.entries .back-to-top:hover
{
	text-decoration: underline;
}
<link href="{page:PathToRoot}Styles/entries.css" rel="stylesheet" type="text/css">
The HTML for the grid should look something like this:
<!-- BEGIN Grid blog_posts -->
<!-- BEGIN Row -->
{post_title} {post_body}
<!-- END Row -->
<!-- END Grid blog_posts -->
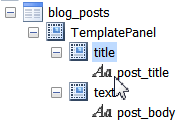
This will create 3 panels underneath the grid in the Project Explorer tree. The first panel, called 'TemplatePanel' is the panel that is mapped to the Master template called 'entries'. The other two panels are the content panels that are mapped to each of the placeholders in the Master template. At this point, the two template variables (the Labels {post_title} and {post_body}) have been moved to the panel called 'Text'. This is correct for the 'post_body' Label but we want the 'post_title' Label mapped to the placeholder called 'Title', so cut & paste the 'post_title' Label into the 'Title' panel. Your page in the Project explorer should look something like this:
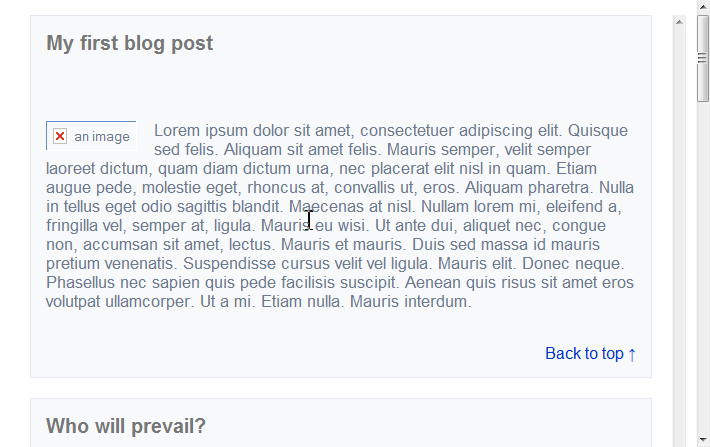
Select the 'post_body' label and change the Label property 'content' from 'text' to 'HTML'. i.e. the content should be interpreted as HTML.
And the result in Preview mode should look like this:
Publish your pages and make sure that the stylesheet you added in 3) above is published with your pages. If you want the images to appear, you will need to copy them from the Examples folder in your installation folder.