CodeCharge Studio
Building Forms Manually
The quickest way to create any type of form is to use one of the builders that automate the process.
If you need to create a form manually in order to gain maximum control of the forms function or appearance you can start with one of the
basic forms located under the Forms tab of the Toolbox.
Setting the Data Source
For a form that will contain database content the Connection and Data Source properties have to be configured to indicate the table and SQL query or stored procedure that will be used to retrieve the data.
With the form selected in the Properties window:
- Connection: Click on the Connection property and select the connection to
be used. If you have not configured a connection for the project you will need to do this
before proceeding.
- Data Source: Click on the [...]button to configure the Data Source.
- Data Source Type: In the Visual Query Builder window set the Data Source Type property to Table, Procedure or SQL.
If the data source type is a table select the appropriate table. For an SQL query enter the SQL statement that will be used to retrieve the form fields.
If the data source type is a Stored Procedure select the procedure from the list provided; configure its parameters.
Within the Data Source window you can also configure input parameter if the form will receive parameters from another form. If the data source type is a table you can also use the Order By field to select
the field by which the records in the form will be sorted by default.
After configuring the Data Source you can begin to add and configure fields
in the form.
Configuring Form Fields
When the form was added to the page it contained two or more fields which are not configured
by default. You can change the field type and the names of these fields to better reflect their content.
- To change a field to a different type: right-click on the field
and use the Change To option to specify the new type.
- Assign the database fields to the form fields by using the Control Source property to select a database field for the form field.
- After setting the Control Source property the Data Type property should also be set to correspond to the data type of the field specified in the Control Source property.
- For some data types such as dates, float, and Boolean values you should also configure the Format property which determines how the value will be displayed.
Adding Columns and Controls to the Form
The form created contains two columns with form fields. You can add more columns
and fields.
- To add columns to the existing table use the Insert Column options in the Table toolbar. The same toolbar also has an Insert Row option to add rows to the table.
- After you add columns to the table you can also add more controls from the Forms tab of the Toolbox.
- As you add the controls configure their essential properties such as Name, Control Source and Format.
Adding Sorter Controls to the Form
You can also add sorter controls to Grid and Editable Grid forms so that the user can sort the form records based on different fields.
It is standard to add sorter controls in the top row of the table above the row containing the actual controls.
- Use the Sorter option under the Forms tab of the Toolbox to add the sorter.
- After adding the sorter configure its properties. The Name property should be changed to a more appropriate name based on the control that the sorter applies to.
- In the Sort Order property select the database field that will be used to perform the sort when the sorter is clicked.
- Sorter controls can vary in complexity with the default being a simple link
that the user can click. You can change the format of the sorter by right clicking on it and selecting the Edit Sorter option.
In the Edit Sorter dialog select a different format for the sorter.
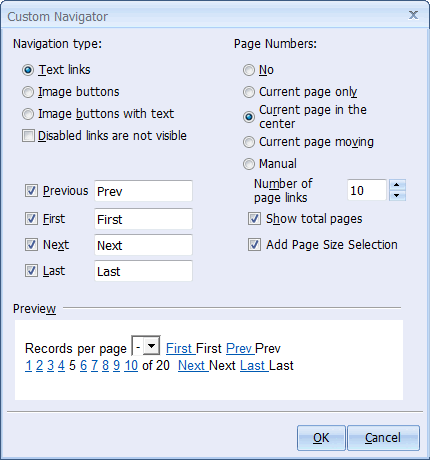
Adding Navigator Controls to the Form
If you are building a Grid or Editable Grid form you should also add a Navigator control to allow the user to browse forms in which the records span more than one page.
It is standard to add the Navigator control to the bottom row of the table. If such a row does not exist you can use the Table toolbar to add a row.
- To add the Navigator click on the Navigator option under the Data tab of the Toolbox.
- When the Create Navigator dialog appears configure the options for the new navigator.
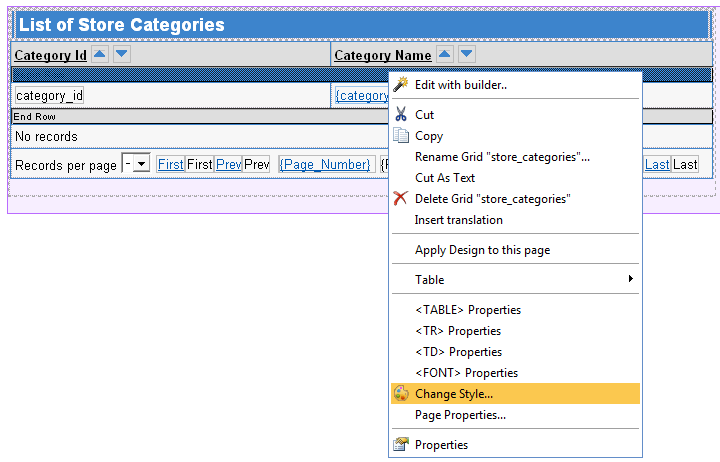
Specifying a Style for the Form
After adding all the components for the form specify a style to enhance the look of the form and its contents.
- Right-click on the form title or icon and select the Edit option.
Select a style from the list of available styles.
On-line, printable versions and updates