To create a project based on one of the .Net languages (i.e., C# or VB.Net), there are certain prerequisites that have to be in place. C# and VB.Net share a similarity with Java and JSP in that there is a compilation process that occurs when the project is published. In most other languages such as ASP and PHP, the project pages are simply published to the server where they can be accessed by a user. For C# and VB.Net, the .cs or .vb files are compiled to create a windows dynamic link library (.dll) which is placed in the /bin folder of the published project.
To generate C# or VB.Net projects you must have a local copy of the ASP.Net Framework Redistributable or the Framework SDK installed on the machine. Make sure that the version you obtain is 1.0.3705 or higher.
On server also required ASP.NET AJAX 1.0. It can be downloaded from: http://www.microsoft.com/downloads/details.aspx?FamilyID=ca9d90fa-e8c9-42e3-aa19-08e2c027f5d6
After installing the .Net framework, you need to tell CodeCharge Studio where to find the compilers for C# and VB.Net. To do so, open the Options | Options... menu and in the Options window, click on the Paths option. In the field entitled .Net SDK, enter the path to the C# or VB.Net compiler file.

The C# compiler is a file called csc.exe while the VB.Net compiler is called vbc.exe. The path to this file depends on the location where the .Net Framework is installed. An example path would be %windir%\Microsoft.NET\Framework\v2.0.50727. Once you have specified the correct path, CodeCharge
Studio will be able to invoke the compiler when the project pages are published.
If you enter the wrong path CodeCharge Studio will inform
you that it was not able to locate the compiler whenever you attempt to publish a .Net project.
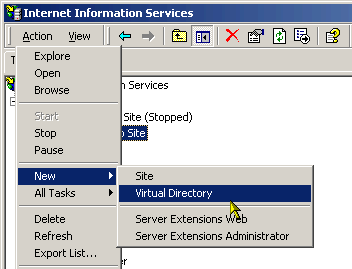
In addition to the compiler requirement all .Net projects must be published to a virtual folder configured in the web server.
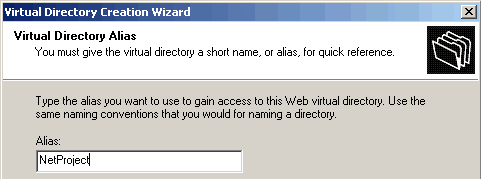
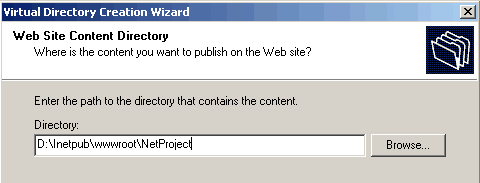
To create a virtual folder open the Internet Information Services Manager and select the site where the project will be published. Then use the Action | New | Virtual Directory menu option to open the Virtual Directory Creation Wizard which will guide you through the steps of creating a virtual directory.

Once you setup the virtual directory, open the Project Settings dialog within CodeCharge Studio.
Under the Publishing tab, specify the directory path for the virtual folder in the Server Path field. The Server URL field should reference the alias name you entered for the virtual folder.
The alias (i.e., NetProject) is assigned to the appropriate path parameters in the settings.

Configure the other project settings as required. When you publish the project, the files will first be generated to a temporary folder where they will be compiled. After compilation, the files, including the compiled .dll, will be published to the specified path where they can be accessed in a browser window using the alias name of the virtual folder.