The Application Builder can be used to create multiple project pages based on the tables or queries in a designated database connection. In some instances, the Application Builder can be used to create all the project pages. The different steps of the Application Builder allow you to create grid, record and search forms for any of the tables within a database connection. Once you've completed the Application Builder steps you can then publish your web pages or edit them within CodeCharge Studio to include custom functionality.
The information provided in this section demonstrates the steps to create multiple project pages using the Application Builder.
There are two ways of accessing the Application Builder:
CodeCharge Studio's Application Builder has nine steps for creating a new project.
The first step of the Application Builder is where you configure the project-wide settings for the following four parameters:
| Parameters | Description |
|---|---|
| Code Language | Select the programming language for the project. |
| Site Language | Select the spoken language for the project pages. |
| Server Path | Specify the server path were the pages will be published. |
| Server URL | Specify the URL that maps to the Server Path specified above. This is the URL you will type into a browser in order to access the pages. |
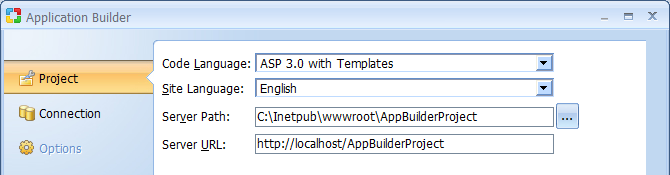
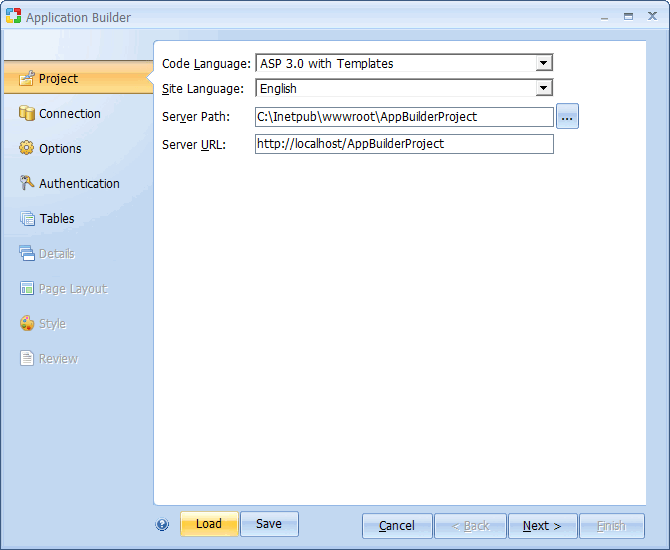
Click Next to proceed to step 2.
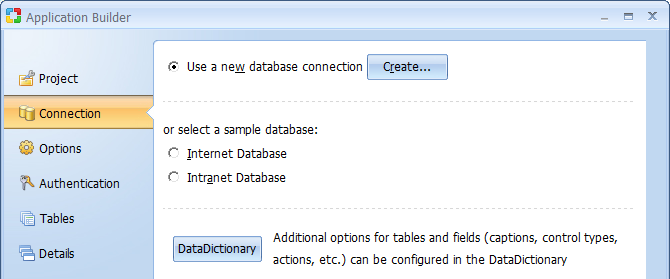
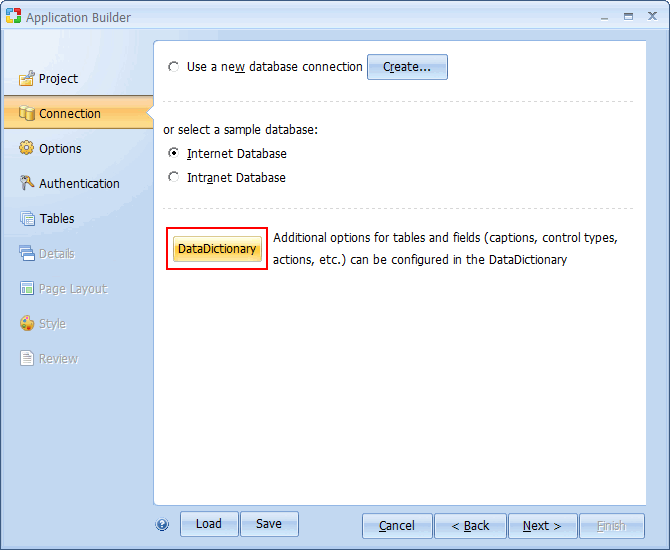
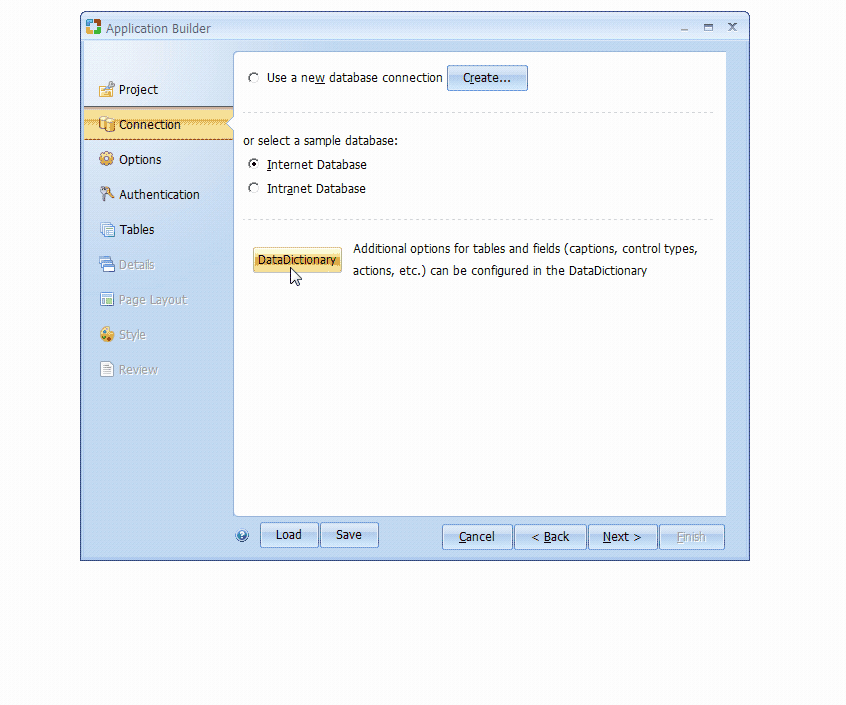
You now have to configure a new database connection for the project or select one of the sample databases included in CodeCharge Studio.
| Parameters | Description |
|---|---|
| Use a new database connection | Select this option if you want to configure a new database connection. You can then click on the 'Create...' button to create the connection. |
| Select a sample database connection | Select either the Internet or Intranet sample database to use for the project. |
| Data Dictionary | Additional options for tables and fields (captions, control types, actions, etc.). Read more... |
If you opted to create a new database connection, click on the Create... button to open the Add New Connection window. You can then create a database connection based on ODBC DSN or a Connection string.
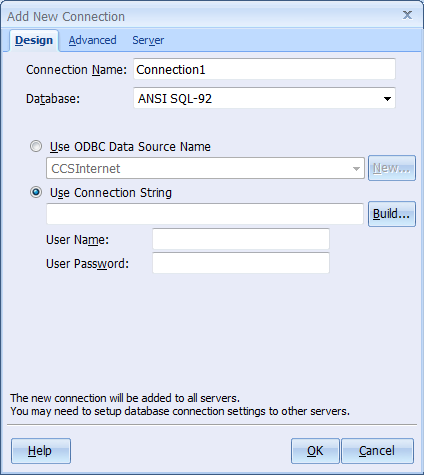
| Parameters | Description |
|---|---|
| Fields | Values |
Click Next to proceed to step 3.
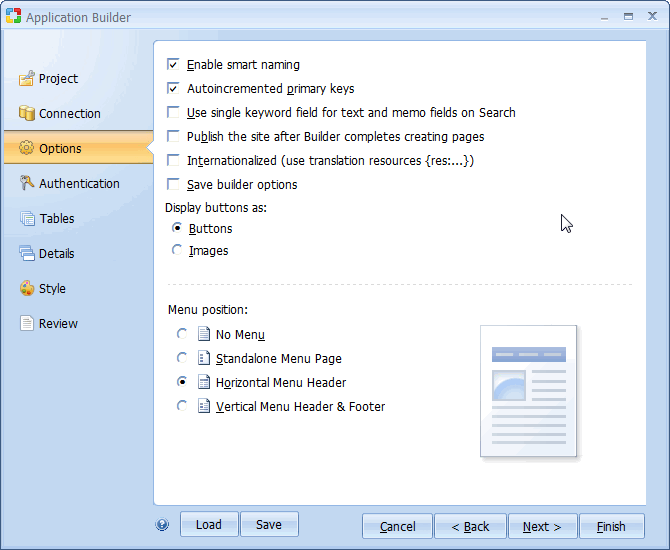
There are a number of options that will determine how the builder will generate the finished pages.
| Parameters | Description |
|---|---|
| Enable smart naming | With this option selected, the Builder will generate English like captions for the database table and field names. For example, the grid form for a database table called 'employees' will have a caption 'List of Employees'. Additionally, fields with underscores in them will be converted to column captions without the underscore e.g. 'task_name' will be shown as 'Task Name'. |
| Autoincremented primary keys | This option should be checked if the tables in your database have autoincremented primary keys. With autoincremented primary keys, new records are automatically assigned unique primary key values by the database when you insert a record, therefore a SQL insert/update should not attempt to modify this field. Note that both of the sample databases have autoincremented primary keys. |
| Use single keyword field for text and memo fields on Search | Select this option if you want search forms to have a single field that can be used to search against all the text and memo fields in the corresponding grid form. If this option is not selected, the search form will have a field for each individual text and memo field. |
| Publish the site after Builder completes creating pages | Select this option if you want the generated pages to be published to the Server Path specified in Step 1 immediately after the Builder completes creating the pages. |
| Menu position | |
| No Menu | If you don't want to have a menu page. |
| Standalone Menu Page | The menu will be placed in a standalone page where the user will be able to navigate to the linked pages. This means that the individual pages will not have a menu and neither will the header & footer pages. |
| Horizontal Menu Header | Creates a horizontal menu of the Header page. |
| Vertical Menu Header & Footer | A vertical menu is placed on the Header & Footer pages that subsequently appear at the top and bottom of all the other pages. |
Click Next to proceed to step 4.
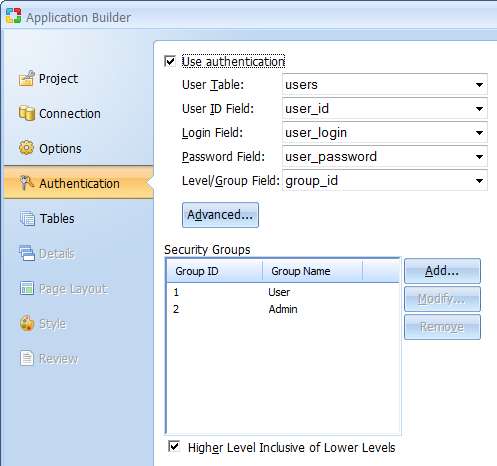
The next step involves setting the Access Authentication Dialog Settings, which are the security mechanism of the project.
| Parameters | Description |
|---|---|
| Use authentication | Select this option if you want your pages to have security authentication. |
| User Table | Select the table where user authentication information is contained. |
| User ID Field | Select the database field with the unique user ID's. |
| Login Field | Select the database field with the Login name of the users. |
| Password Field | Select the database field with the user passwords. |
| Level/Group Field | Select the field with the user security levels. |
| Security Groups | This table contains a list of all the security groups that registered users can belong to. |
| Group ID | The ID of the security group. This also serves as the level of the group. |
| Group Name | The descriptive name for the security group. |
| Higher Level Inclusive of Lower Levels | If this option is selected, users with higher level security groups will be able to access pages with lower security levels (e.g. a user in security group 3 will be able to access pages with security levels 2 or 1 but not 4). |
| Add... | Click this button to add a new security group. |
| Modify... | Click this button to modify an existing security group. |
| Remove | Click this button to remove an existing security group. |
Click Next to proceed to step 5.
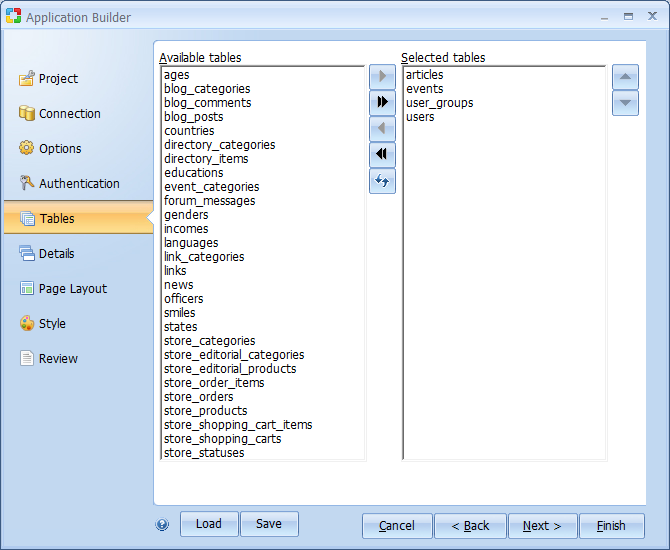
In this step, you select the tables in the database that you want to create pages for.
| Parameters | Description |
|---|---|
| Available tables | This is a list of the tables available in the database. |
| Selected table | This is a list of the tables you have selected and will be able to create pages with forms based on these tables. |
 |
Select an Available table then click this button to add it to the list of selected tables. |
 |
Click this button to add ALL Available tables to the Selected tables list. |
 |
Select a Selected table then click this button to remove it from the list. |
 |
Click this button to remove all Selected tables from the list. |
 |
Select a table then click this button to move it upwards in the order of appearance. |
 |
Select a table then click this button to move it downwards in the order of appearance. |
 |
If you make changes to the database during the process of using the builder, click this button to refresh the connection and retrieve the latest state of the tables. |
Click Next to proceed to step 6.
This is a pivotal step and involves selecting the types of forms to be created for each of the tables you selected in the previous step.
| Parameters | Description |
|---|---|
| Tables | A list of the tables you selected. Click on a particular table to access more configuration details. |
| Grid Pages | |
| Grid | Activate this option if you want to have a grid form for the table. |
| Editable Grid | Activate this option if you want to have a editable grid form for the table. |
| Search | Activate this option if you want to have a search form for the table. |
| Security Level | Specify the security level required to access the form. |
| Record maintenance/view page | |
| Record | Activate this option if you want to have a record form for the table. |
| Updateable | Activate this option if you want the record form to be able to update records. |
| Security Level | Specify the security level required to access the form. |
The Record form depends on being able to find a specific and single record in the datasource, which is normally by the Primary Key of the table. If the Primary Key ('uniqueness') cannot be determined, you will see the following message: "Set the following parameters for '<table name>' tables: Primary Key for the record". Please see Incomplete Data message.
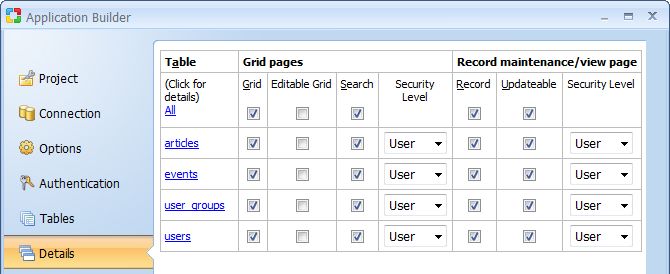
If you click on a particular table name under the Table column, the Details window appears in which you can configure more details for the table.
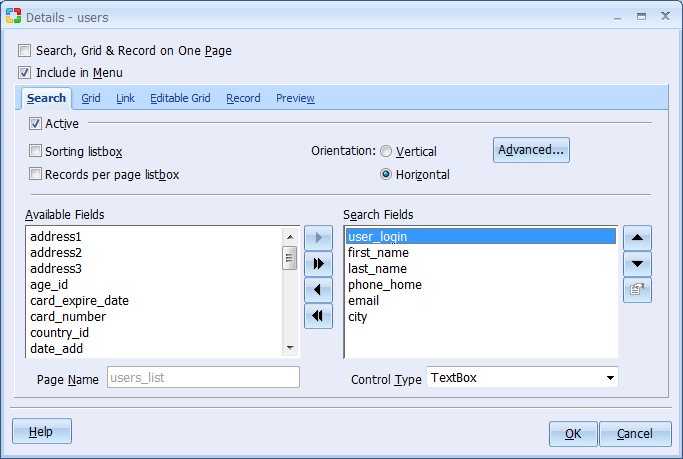
The first tab in the Details window is the Search tab where you can configure an optional search form.
| Parameters | Description |
|---|---|
| Search, Grid & Record on One Page | Search, Grid and Record forms will appear on the same page. |
| Include in Menu | A link to this page will be added in the navigation menu page. |
| Active | Indicates your intention to create a search form. |
| Sorting list box | The search form will have two list-boxes for sorting. The first one will contain a list of all the available fields so the user can select the field to sort by. The second will allow the user to indicate the desired sort order (ASC, DESC). |
| Records per page list box | The search form will have a list-box that can be used to specify the number of records to be returned per page. |
| Orientation | Specify whether the search form should be vertically or horizontally oriented. |
| Advanced... | specify the advanced search option such as a submit method, type and other provided options. If the ‘AND’ condition is selected, the search form will contain an input control (textbox or listbox) for all selected database fields. If the ‘OR’ condition is selected, the search form will include only one textbox control and a value entered into the textbox will be used to search against all selected database fields. Alternatively, you can choose the “Advanced Search” option which creates a single textbox, while also automatically adding a listbox with search options, so that users can specify whether they want to search for “Any Words”, “All Words”, or “Exact Phrase”. After specifying search options you can use the 'Preview' button to see the form preview to confirm the selected options. |
|
Select an Available Field then click this button to add it to the form. |
|
Click this button to add ALL Available Fields to the form. |
|
Select a search form field then click this button to remove it from the form. |
|
Click this button to remove all fields from the search form. |
|
Select a form field then click this button to move it upwards in the order of appearance. |
|
Select a form field then click this button to move it downwards in the order of appearance. |
| Control Type | Specify the control type to be used for each of the fields in the form. |
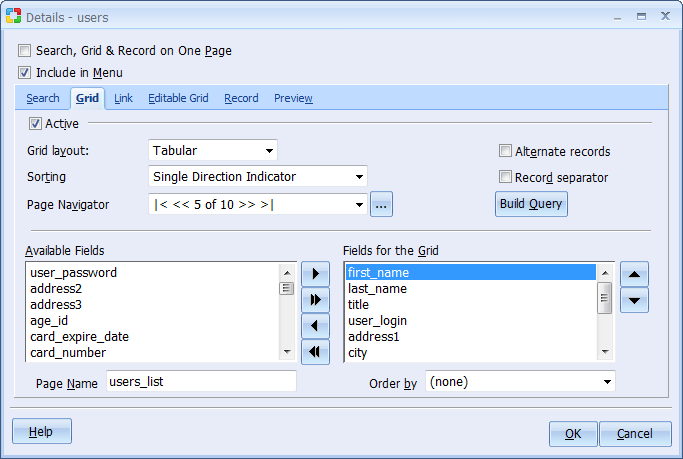
After configuring the search form, you can access configuration options for the grid form by clicking on the Grid tab of the Details window.
| Parameters | Description |
|---|---|
| Active | Indicates your intention to create a grid form. |
| Grid Layout | Select the desired layout of the grid form: Tabular, Columnar, and Justified. |
| Sorting | Select the type of sorting controls you want to have on the grid form. |
| Page Navigator | Select the type of navigation controls you want to have on the grid form. |
| Available Fields | This list-box shows all the fields available in the table or view. |
| Fields for the Grid | These are the fields to be shown in the grid form. They are selected from among the Available Fields. |
|
Select an Available Field then click this button to add it to the form. |
|
Click this button to add ALL Available Fields to the form. |
|
Select a form field then click this button to remove it from the form. |
|
Click this button to remove all fields from the form. |
|
Select a form field then click this button to move it upwards in the order of appearance. |
|
|
Select a form field then click this button to move it downwards in the order of appearance. |
 |
Opens the dialog to specify parameters used for joining with other tables. The Table/View identifies the other to which the current table is bound by the Bound Column. The Text Column is the value returned from the bound table. |
| Page Name | Specify the name of the page where the grid and search form will appear. |
| Order by | Select a field by which the records will be ordered by when initially displayed. |
| Alternate records | Every other record in the grid will appear in a row with a different background color than the preceding record. |
| Record Separator | Each row where a record appears is followed by an empty row that separates it from the next row with a record. |
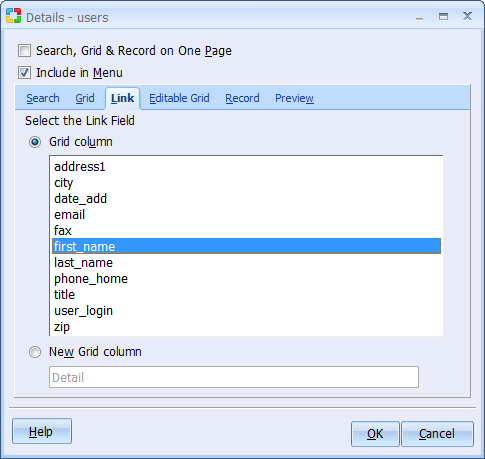
In the 'Links' tab of the 'Details' window, you can specify how the records in the grid form will be linked to the records in the record form.
| Parameters | Description |
|---|---|
| Grid column | Uses one of the existing form fields as the link field. You can then specify the field to be used from among the available fields. |
| New Grid column | You can also create a new column in the Grid form specifically to link to the Record form. Enter some text of your choice to be used for this new grid column. |
| Parameters | Description |
|---|---|
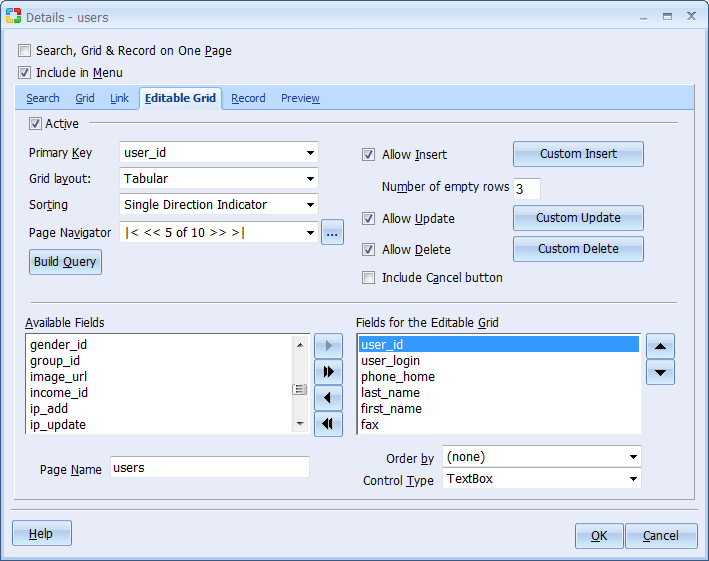
| Active | Indicates your intention to create a editable grid form. |
| Primary key | |
| Grid layout | |
| Sorting | |
| Page Navigator | Select the type of navigation controls you want to have on the editable grid form. |
| Available Fields | This list-box shows all the fields available in the table or view. |
| Fields for the Editable Grid | These are the fields to be shown in the editable grid form. They are selected from among the Available Fields. |
|
Select an Available Field then click this button to add it to the form. |
|
Click this button to add ALL Available Fields to the form. |
|
Select a form field then click this button to remove it from the form. |
|
Click this button to remove all fields from the form. |
|
Select a form field then click this button to move it upwards in the order of appearance. |
|
|
Select a form field then click this button to move it downwards in the order of appearance. |
|
Opens the dialog to specify parameters used for joining with other tables. The Table/View identifies the other to which the current table is bound by the Bound Column. The Text Column is the value returned from the bound table. |
| Allow Insert | |
 |
|
| Number of empty rows | |
| Allow Update | |
 |
|
| Allow Delete | |
 |
|
| Include Cancel Button | |
| Page Name | Specify the name of the page where the editable grid and search form will appear. |
| Order by | Select a field by which the records will be ordered by when initially displayed. |
| Control type |
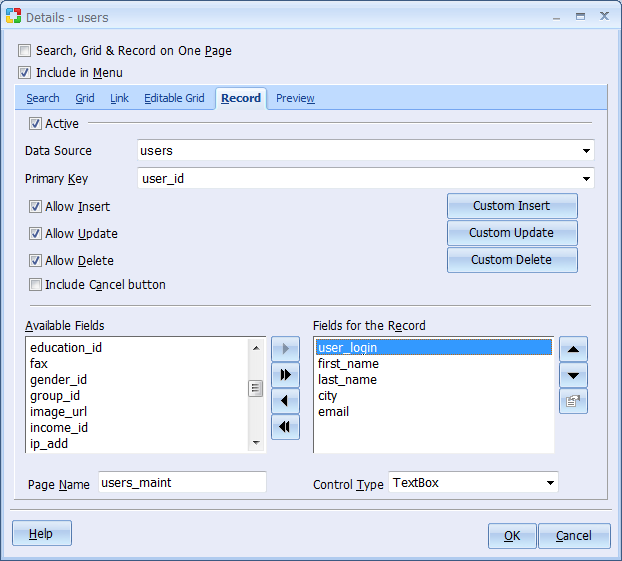
After configuring the link to the record form, you can now proceed to configure options for the record form itself. This is done under the Record tab of the Details window.
| Parameters | Description |
|---|---|
| Active | Indicates your intention to create a record form. |
| Primary Key | Select the primary key field in the table. |
| Available Fields | This list-box shows all the fields available in the table. |
| Fields for the Record | These are the fields to be shown in the record form. They are selected from among the Available Fields. |
|
Select an Available Field then click this button to add it to the form |
|
Click this button to add ALL Available Fields to the form. |
|
Select a form field then click this button to remove it from the form. |
|
Click this button to remove all fields from the form |
|
Select a form field then click this button to move it upwards in the order of appearance |
|
Select a form field then click this button to move it downwards in the order of appearance |
 |
Opens the dialog with advanced properties. To activate the button select a field in the Fields for the Record section.
Note: The following field types have advanced properties: CheckBox List, ListBox, Radio Button and TextBox if the data type is date. CheckBox List, ListBox or Radio Button - Clicking on the button will open the 'List DataSourse' dialog illustrated below. TextBox, datatype is date - Clicking on the button will open the dialog illustrated below. Specify the 'Use pop-up date picker' option if you want to have a popup Data Picker/Selector for this fields. |
| Control Type | Specify the control type to be used for each of the fields in the form. |
| Page Name | Specify the name of the page where the record form will appear. This option is not available when the grid, search and record forms appear on the same page. |
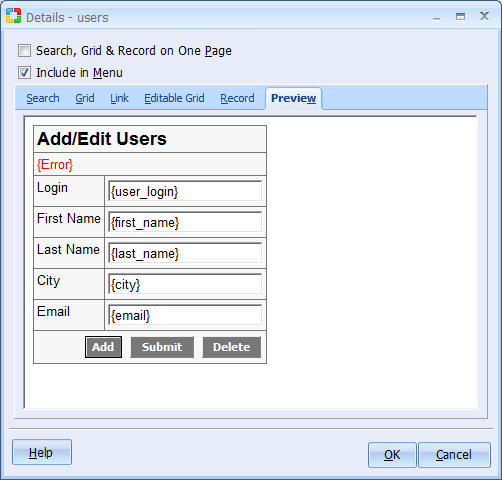
After configuring all the forms, you can preview the final forms by using the Preview tab of the Details window. You will have a chance to select a style at a later stage but at the moment, you can see the layout of the three forms based on the selections you made.
Once you are satisfied with the appearance of the forms, click on the OK button to close the Details window and return to the Application Builder window. If needed, you can click on another table name and access the 'Details' window for that table.
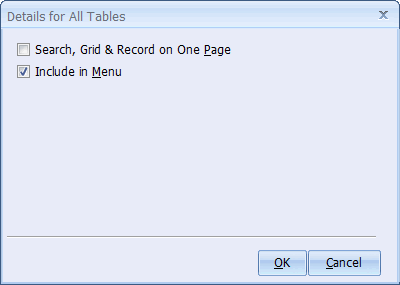
You can also click on the All link in the Table column to apply global options for all the forms to be created:
| Parameters | Description |
|---|---|
| Search, Grid & Record form on One Page | Select this option if you want the Search, Grid and Record forms to appear on the same page for all pages. |
| Include in Menu | If selected, a link to all pages will be added in the navigation menu page. |
Click Next to proceed to step 7.
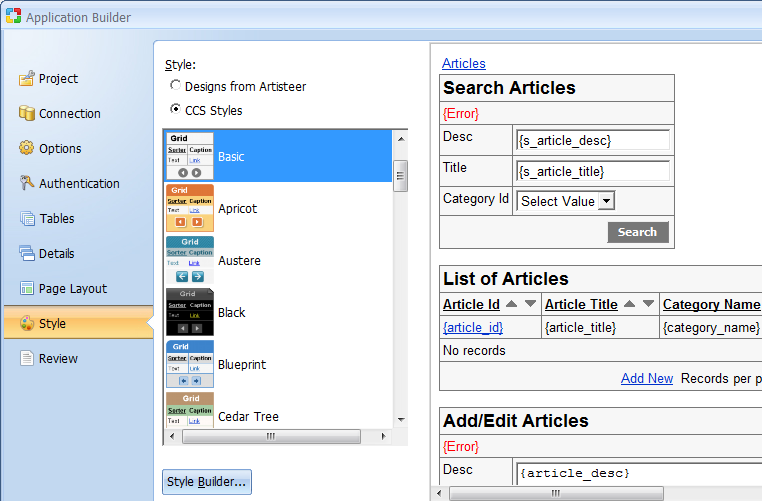
With all the other configurations in place, you now have the chance to select a style to be used for the forms
| Parameters | Description |
|---|---|
| Style | This is a list of available styles. Select the (No Style) option if you don't want to use a style. |
| Preview | This window shows how the forms would look based on the selected style. |
| Style Builder... | This button starts the Style Builder. |
Click Next to proceed to step 8.
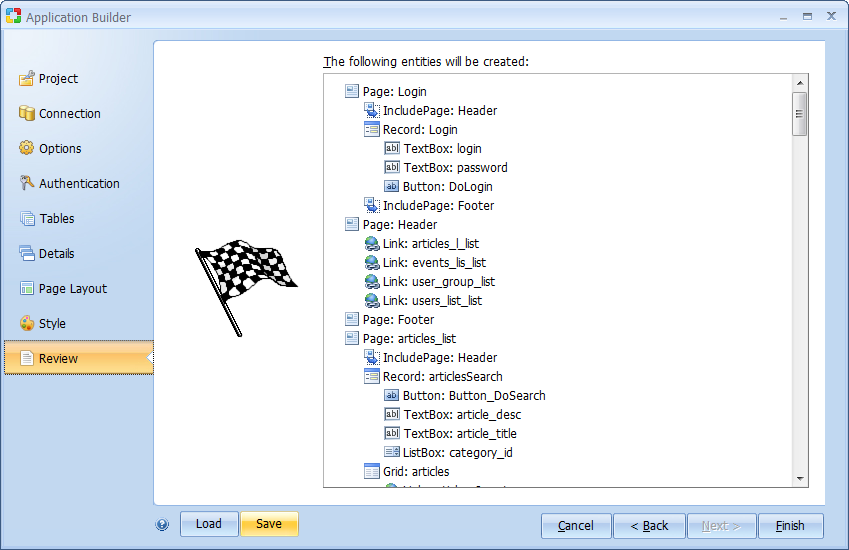
This window displays a summary of the configurations that have been made to this point. Click Finish to generate the pages and optionally publish them to the specified Server Path. Once the pages have been generated, the Project Explorer window will show all the pages for the project. You can then open them and make any necessary changes.