Depending on the database, you will be able to use one or several database connection methods. The common methods include ODBC/DSN and DSN-less/JET. Other connection methods may also be available if you install appropriate database drivers on the computer running CodeCharge Studio.
The following are the configuration options available for the Design Connection.
| Parameter | Description |
|---|---|
| Connection Name | This unique user-selected name identifies the connection. No two connections within the same project can have identical names. You can use multiple connections with different names to, for example, use multiple databases in your project. |
| Use ODBC Data Source Name | This option should be selected if the connection to the database will be through ODBC. Using the list box field, you can select one of the ODBC DSN's that is currently registered on the machine. Alternatively, you can create a new ODBC DSN by clicking on the New... button. |
| Use Connection String | This option specifies a connection string that contains the details necessary to make a connection to the database. Some of the details included in the connection string are: database driver to be used, location of the database file, and the username and password needed to connect to the database. If you are an experienced user, you can simply type in the proper connection string into the provided field. However, most people would find it necessary to click the Build button and use the Data Link Properties windows to create the connection string. |
| User Name | This is an optional field used to specify the username required to login to the database. |
| User Password | This is an optional field used to specify the password required to login to the database. |
Open Database Connectivity (ODBC) is a driver interface that allows CodeCharge Studio and the generated programs to communicate with the database. ODBC needs to be configured to access specific databases by, for example, providing the location information of the database or its IP address. Just like you can create many MS Word documents and save them with different file names, you can configure many ODBC Data Sources and name them differently. A Data Source Name (DSN) is the name of a ODBC configuration.
One of the benefits of using an ODBC connection during design-time is that several people can work on a single project and each can have their own database in a different location, or connect to different test databases and perform testing with their own data. The requirement is that everyone name their ODBC Data Source with the same name, while the ODBC settings may be different. The benefit of using ODBC connections during run-time is that you can copy programs between servers without the need to modify the database connection, if all those servers have equivalent Data Source Names created with the same name.
You can create a new ODBC DSN from within CodeCharge Studio or by using the Data Sources ODBC option available in your system's Control Panel or administrative tools. In either case, the steps involved are essentially identical so we will demonstrate how the process is accomplished from within CodeCharge Studio.
Creating an ODBC DSN for other databases such as MSSQL, Oracle, and Microsoft Excel involve similar steps, except for the last step that varies depending on the database driver. However, once you have created a DSN, you can use it in multiple projects by simply selecting it from among the list of available DSN's.
A design-time connection to a MySQL database must be made by using an ODBC DSN created using the MyODBC driver. This is because It is not possible to connect directly to MySQL at design-time like you can with an Access database using OLE DB. If you intend to connect to MySQL at design-time, you need to first download and install the MyODBC driver which can be obtained from http://www.mysql.com/downloads/api-myodbc.html.
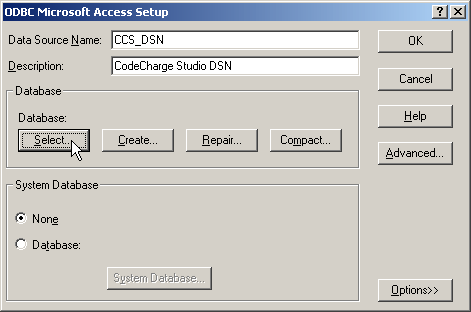
After installing the MySQL driver, proceed to setup an ODBC DSN (Data Source Name) to point to the MySQL database.
| Parameter | Description |
|---|---|
| Windows DSN Name | Name of your choice to be used as the Data Source Name |
| MySQL host | IP address of the machine where the MySQL server is located. For a local database, you can enter 'localhost'. |
| MySQL database Name | Name of the database within the MySQL server. |
| User | User account to be used to access the database. |
| Password | Password corresponding to the User name. |
| Port | By default, MySQL listens to port 3306. If a different port number is used, enter it here. |
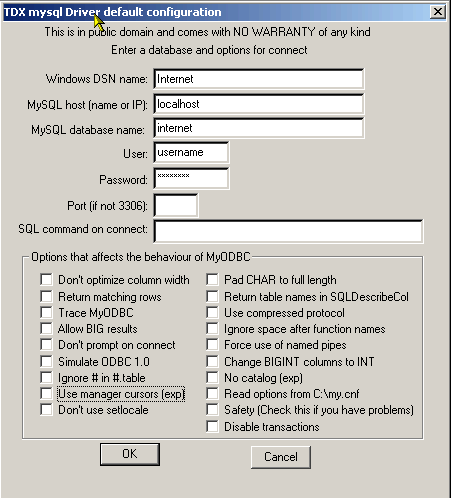
The rest of the fields in the DSN configuration windows can be left blank unless you have a specific reason for configuring them. Once the DSN has been setup using the MyODBC driver, you can now use it for the design-time connection within CodeCharge Studio.
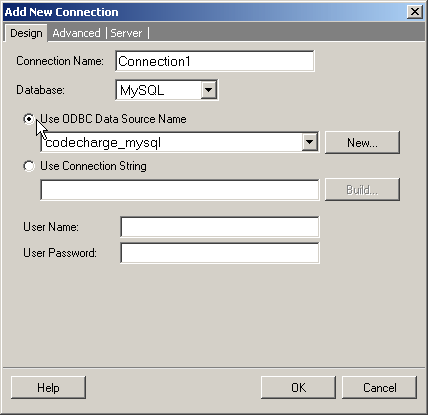
| Parameter | Description |
|---|---|
| Connection Name | Name of your choice to identify the connection within CodeCharge Studio. |
| Database | Select MySQL. |
| Use ODBC Data Source Name | With the radio box checked, select the DSN you previously created using the MyODBC driver. |
| User Name | User account to be used to access the database. |
| Password | Password corresponding to the User name. |
An alternative to using a DSN connection is a DNS-Less connection; a connection string containing the details necessary to establish the connection to the database. The makeup of a connection string varies depending on the database being used as well as the provider/driver. While it is possible to simply type out a proper connection string, the better alternative would be to use the Data Link Properties window to construct one for you.
The Data Link Properties window can be accessed from the Add New Connection or Modify Connection windows by clicking on the Build button. The following list defines the important tabs of the dialog: