PERL projects are published to a CGI (Common Gateway Interface) directory of a PERL enabled server. There are many flavors of PERL which can be installed and configured to make a web server such as Apache or IIS capable to serving .pl files. When PERL pages are published to a server then one of the pages is requested over a browser, the web server invokes an instance of the PERL executable which runs the requested page and returns the results to the user.
Before publishing a PERL project, there are certain properties that are unique to PERL that need to be configured. To configure these properties, click on the project name in the Project Explorer window so that the properties appear under the Data tab of the Properties window.
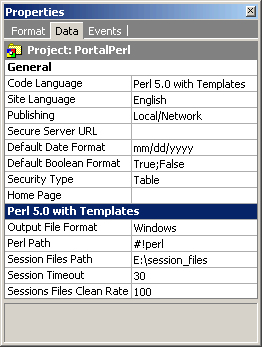
| Field | Description |
|---|---|
| Output File Format | Specify whether the project is going to be published to a Windows or Linux/Unix machine. |
| Perl Path | This is the path to the Perl executable and is sometimes known as the shell-bang or hash bang line. Basically, this line specifies the location of the Perl program and therefore the line changes based on whether a Windows or Linux/Unix machine is being used. An example path for windows would be #!perl while for Linux/Unix, a common path is #!/usr/local/bin/perl. In Linux/Unix, you can find out the location of the Perl executable by typing the command 'which perl' in the command prompt of a shell session. For windows, the command Perl -h should produce information about the program including its path. |
| Session Files Path | Enter the file system path of a folder where the session variable information will be stored. This should be a folder with read/write access. |
| Server Path | Enter the path of a folder where the application will be stored. If this value is not specified the FindBin module will be used to determine this folder. |
| Session Timeout | Specify in minutes the time after which session variables in an inactive session will be terminated. |
| Session Files Clean Rate | This value specifies the interval at which session files are checked for expiration and subsequently deleted. A clean rate of 100 would mean that the check is performed after each 100th page in the application is requested. A larger value results in a longer duration between checks while a lower value causes more frequent checks. |
After publishing a Perl project to a Linux/Unix server, you need to check and make sure that the files have the right permissions. Basically, Linux/Unix allows for three types of permissions: read, write and execute. In addition to these three permissions, there are three groups of people to whom the permissions can be applied to uniquely: the file owner, members of the file's group and everyone else.
If you have access to a Unix shell command prompt within the server, you can find out the permissions for a file using the command "ls -l filename.pl". The permissions are displayed as a set of ten characters representing the permissions for the three groups of users e.g. -rw-r--rw-. The first character '-' indicates that a file rather than a directory is being referred to. The permissions can also be expressed as a three digit number whereby each digit represents the sum of permissions for each of the three categories of user's.
| Read(4) | Write(2) | Execute(1) | ||
|---|---|---|---|---|
| Owner | x | x | x | 7 |
| Group | x | x | 5 | |
| Public | x | x | 5 |
For instance, 700 would assign read, write and execute permissions for the file owner but none for any of the other groups.
For the PERL scripts to be available to the users, you need to assign them the read and execute permissions (e.g. 755). This way, other users other than the owner can read and execute the scripts but not write to them.
Important note: If the project files are published not into the "cgi-bin" folder, the access to "Common.pm" must be closed using the web server settings.
Although CodeCharge Studio does not provide a facility for changing the file permissions, most FTP clients allow you to do so. Alternatively, if you have telnet access to the server, you can execute the chmod command remotely to set the appropriate file permissions.