The Directory Builder allows you to build multi-level category trees. The Category List can be displayed in two or more columns. To begin the process of creating a Directory component, click on the Directory Builder option in Builders tab of the Toolbox.
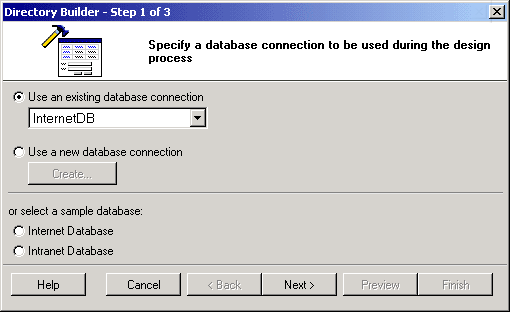
The first step involves selecting or creating a database connection from where the data shown in the directory will be retrieved. You can select one of the existing database connections, create a new connection or select one of the sample databases. Once done click Next to proceed.
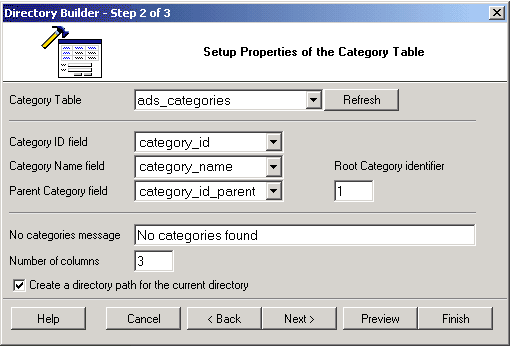
Having selected a connection, you now have to setup the properties of the category table.
| Parameters | Description |
|---|---|
| Category Table | Specify a database table that stores the list of categories to be presented in a directory/index format |
| Category ID field | Specify a category table field that stores the category id |
| Category Name field | Specify a field that stores the category names or descriptions |
| Parent Category field | Specify a field that stores the parent category id |
| Root Category identifier | Specify a value of the Parent Category field for the root (highest-level) categories that do not have a parent, for which you may need to designate a value, such as 0 or -1 used in the Parent Category Id field of the root categories. The value will be set as default for the Data Source property. |
| No categories message | Specify a message to be shown to users when the last (lowest-level) category is reached and there are no additional sub-categories to browse. |
| Number of Columns | Specify a number of columns to output the list of the categories. The value will be set as default for the Number of Columns property. |
| Create Directory Path for the current directory | When selected the Path component will be automatically configured and placed above the Directory component on the page. Otherwise the Path will not be created. |
You can click on the Preview button to see how the form looks like in its current state of construction or Next button to proceed.
The final step involves the selection of a theme for the form.

You can use the Preview button to see how the form looks like. Click the Finish to close the builder and generate the form.