The File Upload component is used to upload files from a remote machine to a specified location on the Web server machine. The component can be used to allow users to upload files to the server, for example, in the case where users are allowed to submit images. The component uses an input control of type file (<Input type=';file';>) which enables the end user to browse for files on their local machine and select them for uploading. When a file is selected and submitted for uploading, the File Upload component checks that the file size does not exceed a specified limit. The component can also be configured to allow or disallow certain file types from being uploaded to the server. After a file is successfully uploaded to the server, it is assigned a name in the form of "yyyymmddHHnnss#.<originalName>", where 'yyyymmddHHnnss' is the datetime value indicating the time when the file was uploaded. This datetime value ensures that the uploaded files have unique names.
Within CodeCharge Studio, the File Upload component can be added within a Record form or an Editable Grid. Both of these forms are capable of submitting values unlike a Grid form which does not submit any values.
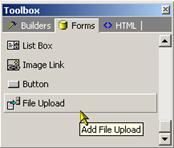
To add a File Upload component, use the File Upload option located under the Forms tab of the Toolbox.
Unlike the other languages, ASP 3.0 does not have native support for uploading files. As such, when using ASP it is necessary to install third party software which will perform the upload when invoked by ASP code. However, this is not necessary if you decide to use the script based pure ASP upload method. Currently, CodeCharge Studio is able to work with the following upload components:
CLSID: Persits.Upload
Company: Persits Software, Inc.
URL: http://www.persits.com
CLSID: ActiveFile.Post
Company: Infomentum
URL: http://www.infomentum.com
CLSID: ABCUpload4.XForm
Company:WebSupergoo
URL: http://www.websupergoo.com
CLSID: Dundas.Upload.2
Company:Dundas Software
URL: http://www.dundas.com
Author: Jacob "Beezle" Gilley
Email:avis7@airmail.net
Modified by: Will Bickford
Email: wbic16@hotmail.com
The Uploading Script which uses ADODB.Stream is faster than the script based upload components. The secret to the speed lies within ADO's Recordset and Stream objects. It is recommended to use "ASP/VBScript Upload using ADODB.Stream", if COM based components are not available.
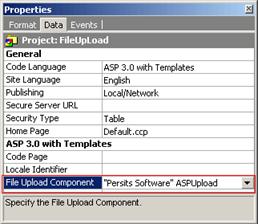
If using one of the COM based components, the component must be installed and properly configured on the server where the ASP pages will be published. If an ASP project is going to have one or more File Upload components in its pages, the File Upload Component property of the project must be set to indicate the file upload component that is available on the server. To locate this File Upload Component property, click on the project name in the Project Explorer window so that the project properties are exposed in the Properties window. If you set the File Upload property of the project to blank, then the File Upload code will not be generated in Common Files.
When viewed in Design
mode, the File Upload component appears between the glyphs  and
and  .
.

<!-- BEGIN FileUpload name -->
  <input type="hidden" name="{ControlName}" value="{State}">
  <!-- BEGIN Info --> {FileName} {FileSize} bytes <!-- END Info -->
  <!-- BEGIN Upload --><input type="file" name="{FileControl}"><!-- END Upload -->
  <!-- BEGIN DeleteControl --> Delete <input type="checkbox" name="{DeleteControl}" {DeleteChecked}><!-- END DeleteControl -->
<!-- END FileUpload name -->
The File Upload component is made up of the following elements.
The first element in the File Upload component is a file input control. The HTML code for the file input control is of the nature:
<input type= "file" name= "{ControlName}">

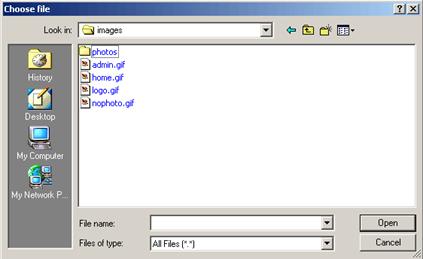
The file input control allows the user to select a file from their local machine. When the user views a page with the control, they can click on the Browse… button for the control which will open a dialog window where the user can navigate to and select a file from their local machine.

The file that is selected will then be uploaded to the server when the form is submitted. Before the file is stored on the server, the File Upload component performs validation checks to ensure that the file does not exceed a specified size limit or is of a type that is not allowed. If the validation fails, the form will appear again with an error message and the file will not be saved to the server.
Note that the file input control appears when a new record is being inserted or there is no currently existing file associated with the record being viewed. If the record being viewed has an existing file, the File Upload component will display information about the file and hide the file input control.

Also the file input control is always displayed if the Required property of the form is set to 'Yes'. In this case the information about the file and file input control is shown.

The File Upload component also contains a hidden input control whose HTML code is of the form:
<input type= "hidden" value= "{ActualFileName} name= "{ControlName}">

This hidden input control is used when a record containing an existing file is being viewed. In this case, the value of the input control is set to the actual filename of the file that is currently present. The user does not see the hidden input control but the value it contains is used by the form when the form is submitted. This hidden input control should not be altered or deleted otherwise the component will not function properly.
The File Upload component also contains two template variables called FileName and FileSize.

When the page is viewed by the user, these two variables are substituted with values as follows:

The FileName and FileSize template variables are empty whenever a new record is being added or an existing record does not have a file associated with it. The variables will only appear when there is a file already associated with the current record. These two template variables should not be altered or deleted otherwise the component will not function properly.
The last element in the File Upload component is a checkbox which is used to indicate whether an existing file should be deleted from the server.

The checkbox will only appear if the current record being viewed has an existing file associated with it. When the checkbox is checked and the form is submitted using the Update button of the form, the file will be deleted from the server. Note that if you want to delete the file only, you should use the Update button of the form with the checkbox checked.

However, if you want to delete the file as well as the database record associated with it, you should use the Delete button of the form.
